The Immerse with Migaku Browser Extension User's Manual
Table of Contents
- Intro
- Installation
- Updating
- Uninstalling
- Main Components
- Hotkey Overview
- Main Features
- Extra Features
Intro
The Immerse with Migaku Browser Extension is an extension for Google Chrome and other Chromium-based browsers that aims to make immersion learning as convenient and approachable as possible!
It allows you to make instant Anki flashcards from video streaming sites such a Netflix, and YouTube, and from your local video and subtitle files. Not only that, the extension creates very high quality cards that include a screenshot and audio recording of the portion of the video you were watching:
Besides this instant high quality flashcard creation, the Immerse with Migaku Browser extension also offers support for Word Learning Status Underlining.
The continual development of the Immerse with Migaku Browser Extension is a big part of the future vision we have for Migaku, and we hope you're as excited about it as we are!
* The Immerse with Migaku Browser Extension will be coming to Firefox in the near future.
The Immerse with Migaku Browser Extension is still a work in progress and you may encounter bugs while using it. If you do please use the support page for help resolving your issue, and report any issues that you're confident is a bug. Also, the current styling of the Extension is entirely utilitarian, but it will be professionally aesthetically styled once it is feature complete.
Installation
In order to use the Immerse with Migaku Browser Extension's Instant Card Creation features you must install Migaku Dictionary . We recommend installing Migaku Dictionary first and then installing the Browser Extension.
The Immerse with Migaku Browser Extension is currently only compatible with Google Chrome and other Chromium-based browsers. You will not be able to use the extension if you are not using a compatible browser.
* The Immerse with Migaku Browser Extension will be coming to Firefox in the near future.
Before you can install Migaku Dictionary you must first download the necessary installation files. As the Immerse with Migaku Browser Extension is still one of our beta software projects, it is currently only available to Migaku Patreon supporters. You can find the link to download the necessary files on this Patreon Post.
There are 2 files available for download on the Patreon Post:
- The Immerse with Migaku Browser Extension itself (a ZIP file).
- If you are studying Japanese, you can optionally download the
accentAudio.zipZIP file which adds the ability to click words to play a recording for that word.- The support for this feature is coming to other languages in the near future.
Once you have downloaded the Browser Extension (and optionally accentAudio.zip for the Japanese learners), you can do the following to install it:
- Unzip the Immerse with Migaku Browser Extension zip file's contents to a desired install location on your computer.
- The contents of the zip file are a single folder named
ImmerseWithMigaku. You should then have this folder located where you chose to unzip if on your computer;[Installation Folder]/ImmerseWithMigaku.
- The contents of the zip file are a single folder named
- If you have downloaded
accentAudio.zipyou should now unzip the contents of that file (the contents are a single folder namedaccentAudio), into yourImmerseWithMigakufolder.- The resulting path will be:
[Installation Folder]/ImmerseWithMigaku/accentAudio. - * There are many audio files contained within
accentAudio.zip, so it may take considerable time to unzip depending on your computer's hardware.
- The resulting path will be:
- Open Google Chrome's (or your Chromium Based Browser's) Settings Menu.
- Navigate to the "Extensions" tab.
- In Google Chrome there will be an "Extensions" button near the bottom of the Menu List on the left side of the screen. Clicking this button will open the "Extensions" tab.
- In the top right of the "Extensions" tab you will see a switch labelled "Developer mode". Enable this switch to turn Developer Mode on.
- Once Developer Mode is enabled you will see three new options appear; "Load Unpacked", "Pack Extension", and "Update".
- They will appear on the top left of the screen in Google Chrome.
- Click the "Load Unpacked" button and navigate to and select your
ImmerseWithMigakufolder ( found in[Installation Folder]/ImmerseWithMigaku), then click the "Select Folder" button.- The Immerse with Migaku Browser Extension will then be installed into your internet browser.
Updating
To update the Immerse with Migaku Browser Extension:
- Unzip the new version of the Immerse with Migaku Browser Extension zip file's contents to a temporary location on your computer.
- The contents of the zip file are a single folder named
ImmerseWithMigaku. You should then have this folder located where you chose to unzip if on your computer;[Temporary Location]/ImmerseWithMigaku.
- The contents of the zip file are a single folder named
- Copy all of the files of the new update's
ImmerseWithMigakufolder ([Temporary Location]/ImmerseWithMigaku/[Files]). - Paste all of these files into your current installation folder (
[Installation Folder]/ImmerseWithMigaku). - Open Google Chrome's (or your Chromium Based Browser's) Settings Menu.
- Navigate to the "Extensions" tab.
- In Google Chrome there will be an "Extensions" button near the bottom of the Menu List on the left side of the screen. Clicking this button will open the "Extensions" tab.
- Find the "Immerse with Migaku" extension, and click the Refresh button (it is a loading icon in Google Chrome).
- Delete the update folder
[Temporary Location]/ImmerseWithMigaku.
Uninstalling
To Uninstall the Immerse with Migaku Browser Extension:
- Open Google Chrome's (or your Chromium Based Browser's) Settings Menu.
- Navigate to the "Extensions" tab.
- In Google Chrome there will be an "Extensions" button near the bottom of the Menu List on the left side of the screen. Clicking this button will open the "Extensions" tab.
- Find the "Immerse with Migaku" extension, and click the "Remove" button.
- Delete the installation folder (
[Installation Folder]/ImmerseWithMigaku).
Main Components
The Immerse with Migaku Browser Extension has several components that make it up. In this section we will take a brief look at each of them and cover some aspects of their usage. The main features which incorporate the usage of many of these components are covered in the Main Features section however.
The Migaku Toolbar
Once you have Enabled the Migaku Toolbar in the Extension Menu then when you visit a website the toolbar will appear shortly after the page is loaded. The appearance of the Migaku Toolbar will differ depending on a couple factors:
- The type of page you are visiting:
- A supported streaming platform site (the extension currently supports Netflix and YouTube), or the Migaku Player Page.
- Any other website besides those stated above.
- The language that is currently selected.
- The Migaku Toolbar with languages with extra functionality (including Word Learning Status support and/or Extra Features ) may have a unique layout based on what functionality is available to that language. (Currently only
Japanesehas extra functionality, but extra functionality is coming to other languages very soon.) - The Migaku Toolbar with languages without extra functionality will have a default appearance shared by all of those languages.
- The Migaku Toolbar with languages with extra functionality (including Word Learning Status support and/or Extra Features ) may have a unique layout based on what functionality is available to that language. (Currently only
Default Toolbar Buttons
The Migaku Toolbar will share some Default Toolbar Buttons no matter where it is being displayed.

The Default Toolbar Buttons are:
- The Repositioning Button
- Clicking and dragging the Repositioning Button allows you to place the toolbar wherever you would like on the screen. (The last location is remembered.)
- The Shrink/Expand Toolbar Button
- Clicking this button will toggle the Migaku Toolbar Between Expanded Mode and Shrunk Mode
- The Main Language Selector.
- Allows you to select the language of the Main Subtitle Track to display on supported streaming platforms or on Migaku Player.
- Allows you to select which language you want to display Word Learning Statuses for, or have Extra Features applied for.
The Toolbar on a Supported Streaming Site and on Migaku Player

The toolbar on supported streaming sites, and on the Migaku Player page will have a set of "Streaming Player Buttons" along with the Default Toolbar Buttons. These "Streaming Player Buttons" help with functionality such as selecting a secondary subtitle, downloading subtitles, and controlling playback speed.

The Streaming Player Buttons are:
- The Secondary Language Selector (if Enabled, it can be disabled on the Text & Font tab of the Settings Page).
- Allows you to select the language of the secondary subtitle track (if any) that you wish to display.
- The Subtitle Mode Selector.
- Allows you to change the subtitle mode in use.
- The Skip Mode Selector.
- Allows you to change the speed the video plays at when a subtitle hasn't been on the screen for at least 1 second.
- The Download Subtitles Button.
- Allows you to download the subtitle currently selected as the Main Language.
- The Export 1T (Meaning Export 1 "Target").
- The Export All. Button.
- Allows you to export all subtitles lines in a show as Anki cards.
- The Subtitle Browser Button.
- Opens and Closes the Subtitle Browser.
The options that appear on the Main Language Selector and Secondary Language Selector are by default a list of all the subtitles available for the currently loaded show. You can also load your own subtitles into any show you are watching.
* Loading your own local subtitles is required when using Migaku Player.
The Toolbar on All Other Sites
The toolbar on sites other than supported streaming platforms (Currently Netflix and YouTube), or the Migaku Player Page will only contain the Default Toolbar Buttons and any Extra Functionality Buttons that the selected language has (either Word Learning Status or Extra Feature related buttons).
The Main Language Selector by default will show the Disabled option plus a list of all languages with Extra Functionality (Currently only Japanese). When "Disabled" is selected as the Main Language, the toolbar has no functionality and is disabled but is still displayed.
Switching between "Disabled" and a language with extra functionality will change the look of the Toolbar. You can find out more about this in the next two sections.
Languages With Extra Functionality
Extra functionality refers to either Word Learning Status Support or Extra Features for a specific language.
When a language with extra functionality is selected as the Main Language then any buttons supplying that language's Extra Functionality are loaded into the Migaku Toolbar.
You can find out more about how this functions by checking out the Word Learning Status and the Extra Features sections.
* Extra Functionality (in the form of both Word Learning Status Support and Extra Features ) is currently only available for Japanese.
Languages Without Extra Functionality
This only applies when using the Immerse with Migaku Browser Extension on supported streaming platforms and the Migaku Player page, because when you visit any other page the Migaku Toolbar will only display "Disabled" and a list of languages with Extra Functionality in the Main Language Selector's drop-down menu. Which means that you will not be able to select a language without extra functionality since there would be no functionality that could be applied to the webpage being visited. You can find out more about this in the relevant section.
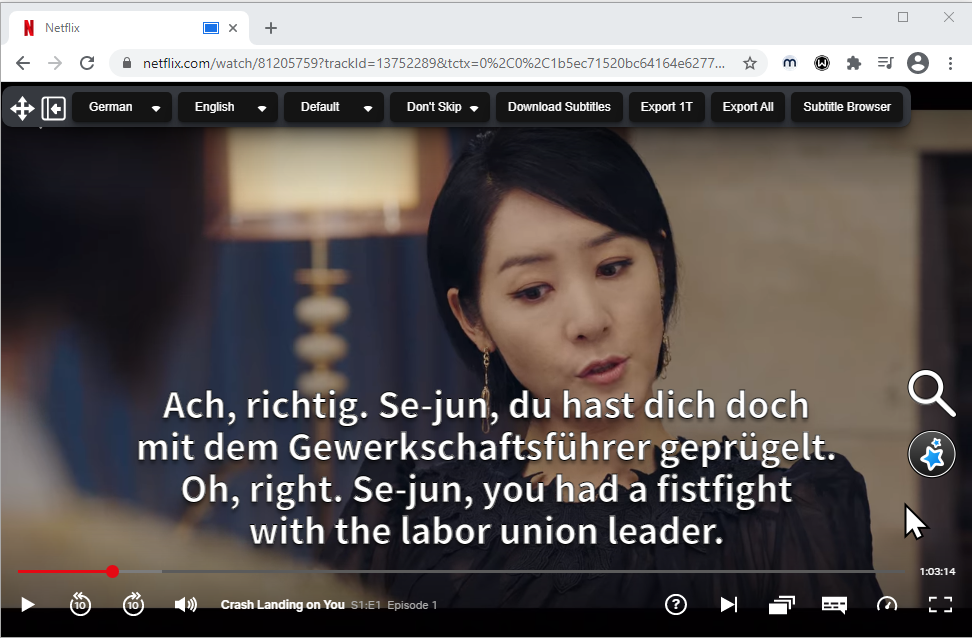
In constrast when using the Immerse with Migaku Browser Extension on supported streaming platforms and the Migaku Player page, the Main Language Selector's drop-down menu is populated with all of the subtitles available for the given video you're watching (or any local subtitles you have loaded).

As you can see in the above image with Korean selected as the Main Language, we still have all of the Streaming Site Buttons available. This is in order to allow Instant Flashcard Creation for videos and subtitles of any language not just those with Extra Functionality. You can find out more about creating flashcards in the relevant section.
Streaming Site Integration
The Immerse with Migaku Extension has support for popular online video streaming platforms.
Supported Streaming Platforms
Currently we offer support for:
- Netflix
- YouTube
We plan to release support for many other popular streaming platforms in the near future.
The main way this integration happens is through:
- The Migaku Toolbar
- The Subtitle Browser
- The Font Settings Button
- The Subtitle Settings Button
- Video Player Hotkeys
The Migaku Toolbar and The Subtitle Browser are covered in their respective sections. So let's take a brief look at the Font Settings Button, the Subtitle Settings Button, and the Video Player Hotkeys
The Font Settings Button
The Font Settings Button appears along with the Subtitle Settings Button when the top right corner of the video being played is hovered.
Clicking the Font Settings Button will open the Settings Page to the Text & Font Tab where you can change the font, color, size among other text-related settings. Please visit the Text & Font Tab section to find out more.
The Subtitle Settings Button
The Subtitle Settings Button appears along with The Font Settings Button when the top right corner of the video being played is hovered.
Clicking the Subtitle Settings button will open the Subtitle Adjustment Window. In the Subtitle Adjustment window you can both load your local subtitle files onto a video, and retime those subtitles so that they are displayed at the correct times when watching the video. You can find out how exactly to do these things in the Loading Local Subtitles section.
Video Player Hotkeys
These hotkeys are not only valid for supported streaming platforms but are also valid for Migaku Player as well.
The hotkeys are:
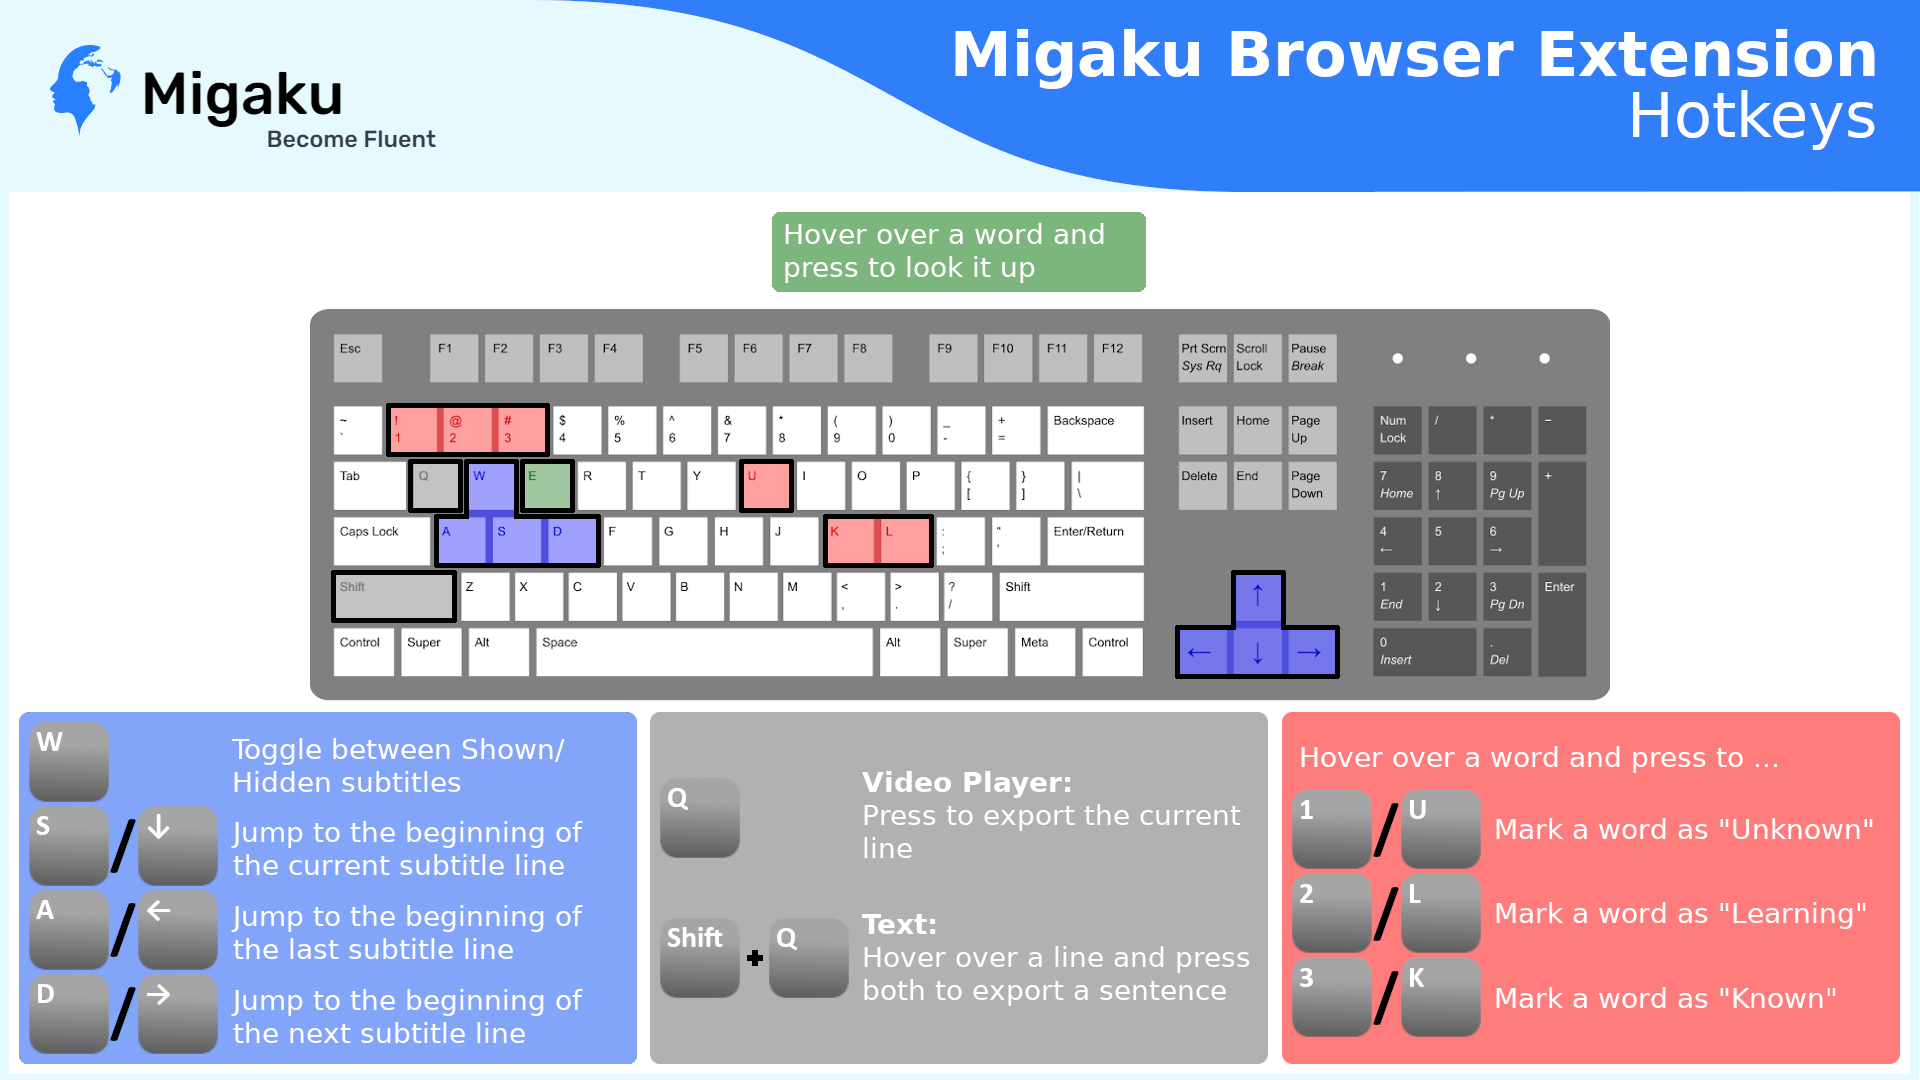
- "a" or "←" : Seek video to beginning of the previous subtitle.
- "d" or "→" : Seek video to beginning of the next subtitle.
- "s" : Seek video to beginning of the currently displayed subtitle.
- "w" : Toggle between Shown/Hidden subtitles
- "q" : Add an Anki card for either the currently displayed subtitle, or all subtitles that have been selected in the Subtitle Browser.
A hotkey for searching currently selected text will be implemented in the very next update.
The Subtitle Browser
You can open the Subtitle Browser by pressing the Subtitle Browser button on the Migaku Toolbar on any supported streaming platform or on the Migaku Player page. You can also close the Subtitle Browser at anytime by pressing the Subtitle Browser button when the Subtitle Browser is already open.
The Subtitle Browser displays a list of all subtitles for the currently selected Main Language. If the Main Language is set to "Disabled" then the Subtitle Browser will be blank.
Along with being an easily reviewable list of all the Main Language subtitles. The Subtitle Browser also:
- Automatically scrolls to keep up with the current subtitle being displayed.
- Right click a subtitle timestamp to jump to that point in the video.
- Allows you to easily search words in Migaku Dictionary.
- Allows you to select multiple subtitle lines and export them to a single Anki Card.
- This allows you to export a card for a larger portion of dialogue for more context when needed.
Website Integration
On any website that is not a Supported Streaming Site, and is not the Migaku Player page, only the Default Toolbar Buttons and the selected language's Extra Functionality buttons are available.
This allows you to read websites with features like Word Learning Status Underlining and other language specific Extra Features, like pitch accent coloring for Japanese as shown above for example.
To find out more about these features, reference their relevant sections:
The Extension Menu
The Extension Menu is the menu displayed when the Extension Menu Button is clicked.
The Extension Menu contains 4 different options:
- Settings - Opens the Settings Page when clicked.
- Allow Recording - Enables Recording on the currently focused browser tab. This is required to create instant Anki flashcards.
- This functionality is covered in greater detail in its relevant section.
- Migaku Player - Opens a new Migaku Player page when clicked.
- Disable/Enable Migaku Toolbar - Enables/Disables the Migaku Toolbar when clicked.
- Reloading a webpage is required in order for this change to be reflected.
* We recommend clicking the "Puzzle Piece" icon on Chrome, and then clicking the "Thumbtack" icon next to the "Immerse with Migaku", this will pin the extension's Extension Menu Button onto your main Chrome toolbar, making reaching it much more convenient.
Migaku Player
Migaku Player is a video player that allows you to play your own local video and subtitle files while using all of the Immerse with Migaku Browser Extension functionality that is available on Supported Streaming Platforms.
Migaku Video Player shares almost all of its functionality found with that found in the Streaming Site Integration.
The shared functionality includes:
- The Migaku Toolbar
- The Subtitle Browser
- The Font Settings Button
- The Subtitle Settings Button
- Video Player Hotkeys
Please reference the relevant sections linked above to find out more about that functionality.
Besides this shared functionality Migaku Player of course also gives you the ability to load in your own local video files.
You can load your local video files by:
- Hovering over the top-left corner of the player page to display the "Load Videos" button.
- Clicking the "Load Videos" button to display both the Migaku Player Playlist, and the Video Loading Area.
- Dragging and dropping your local video files onto the Video Loading Area will load them into Migaku Player and automatically play the first file.
- * Because Migaku Player is an internet browser based player it can only play video formats that are supported on Chromium based internet browsers. If you find that your local video files are imcompatible with Migaku Player, please check out our other project Migaku MPV. Migaku MPV is an extension for MPV Player, a 100% free and open source video player that supports any video format.
When a video has been loaded the video currently being played will be displayed to the right of the "Load Videos" button. To the left and right of the name of the video currently being played you will find the "Previous Video" and "Next Video" buttons, click them will play the previous or next video in the Migaku Player Playlist respectively.
The Migaku Player Playlist
Pressing the "Load Videos" button when one or more videos have been loaded into Migaku Player will display the Migaku Player Playlist in the left half of the popup window.
- Clicking the play button next to the name of any video file will play that file.
- Loading in any new video files will destroy the current playlist and create a new one from the newly loaded video files.
To find out more about Instant Anki Flashcard Creation with Migaku Player, please reference the relevant section.
The Settings Page
The Settings Page is accessed by clicking the "Settings" button in the Extension Menu.
The Settings Page has four tabs:
The Text and Font Tab
The Text & Font Tab allows you to customize the appearance of:
- The Main Subtitles (the subtitles loaded by Main Language Selector).
- The Secondary Subtitles (the subtitles loaded by the Secondary Language Selector).
Any changes made here will be reflected on all Supported Streaming Platforms and on Migaku Player.
For both the Main Subtitles and Secondary Subtitles you can:
- Change the font being used.
- The first drop-down menu is the language group of fonts that you would like to use.
- The second drop-down menu is the specific font within that group that you would like to use.
- Change the size of the font.
- Change the main color.
- Change the border color.
- Change the border-width.
* The font preview will be updated whenever any changes are made.
There are also two Secondary Subtitle exclusive options:
- Enabled
- If unchecked the Secondary Language Selector and Secondary Subtitles will be completely disabled.
- Blur Until Hovered
- If checked Secondary Subtitles are blurred until they are hovered, else if unchecked they are never blurred.
Once you have finished adjusting these settings you must hit the "Save Changes" button at the top right corner of each box to save those changes. You can reset to the default settings at any time by pressing the "Reset Defaults" button.
You will need to reload any page that is already using the extension for the changes to take effect.
The Recording Settings Tab
 The Recording Settings Tab is where you can adjust any settings related to recording audio or taking pictures when creating Anki Flashcards.
Currently there are 2 settings:
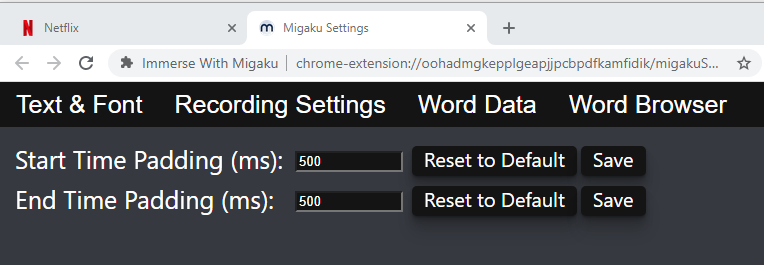
- Start Time Padding (ms).
- The number of milliseconds before the original subtitle line's starting time to begin recording.
- End Time Padding (ms):
- The number of milliseconds before the original subtitle line's ending time to end recording.
* The subtitle timings of different videos can vary substantially, it is likely that you may at times want to adjust these settings to ensure no audio is cut off when creating Anki Flashcards.
You will need to reload any page that is already using the extension for the changes to take effect.
The Word Data Tab
 The Word Data Tab is where you can manage your Word Learning Status Word List.
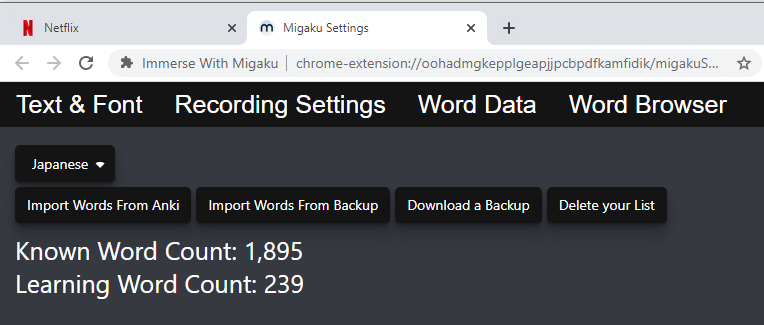
At the top of this tab you will see a drop-down menu. This drop-down menu is for selecting which language you would like to manage your Word Learning Statuses for. Because currently, Japanese is the only language that supports Word Learning Statuses the only option in the drop-down menu is Japanese.
Besides the Language Drop-Down Menu, you will also see 4 buttons on this page:
- Import Words From Anki
- Clicking this button allows you to automatically import Word Learning Statuses for words you've studied in Anki.
- Find out more about this function in the Importing Learning Statuses From Anki section.
- Import Words From Backup
- If you have downloaded a Word List Backup using the "Download a Backup" button talked about next, then you can import that backup by clicking this button and selecting it.
- Download a Backup
- Clicking this button will download a backup of your current Word List in
.jsonformat.
- Clicking this button will download a backup of your current Word List in
- Delete your List
- This will delete your current Word List.
Below these buttons your will find two numerical values.
- Known Word Count
- You can find out more about "Known Words" here .
- Learning Word Count
- You can find out more about "Learning Words" here .
* Currently a progress bar is not implemented to show you how far along in the process the import is. You will know when the import is finished because you will see the "Known Word Count" and "Learning Word Count" values update when importing finishes. Importing from Anki takes considerably longer than importing from a backup. We will be implementing a Progress Bar in the very near future.
Here we are downloading a backup of our current Word List, then deleting our Word List within the extension, then re-importing our Word List from the Backup we just made. This is just to demonstrating the functionality of each button of course, as there would never be a need to do these actions in this order.
* Importing words from either Anki or from a Backup will not overwrite your current Word List. Instead the 2 lists will be combined and words in your current Word List will be updated. You can find out more about how this works in this section
The Word Browser Tab
The Word Browser Tab simply allows you to browse and search for words in your Word List.
Hotkey Overview
Main Features
The Immerse with Migaku Browser extension has a wide variety of features and integrates with a couple of our other Migaku Software Projects.
Migaku MPV Integration
Migaku MPV is our official MPV Player plugin!You can find out more about Migaku MPV on its designated page. Know however, that using Migaku MPV along with the Immerse with Migaku Browser Extension is entirely optional. Migaku MPV is designed to help those of you who primarily study from your own downloaded video files, and have many files that are incompatible with Migaku Player. If that's the situation you find yourself in, be sure to check Migaku MPV out!
Migaku Dictionary Integration
Making use of the integration with Migaku Dictionary is an integral part of using the Immerse with Migaku Extension to its full potential.
If you have not yet installed Migaku Dictionary, please click this link to view its installation instructions.
The main features that this integration allows are the card creation features which are covered in their own section, and the ability to easily search the dictionary, which we will go over now.
Searching in the Migaku Dictionary
There are 3 types of searches that can be carried out from the Immerse with Migaku Browser Extension to the Migaku Dictionary Add-on:
- Searching text that you have selected/highlighted.
- Automatically Searching All Unknown Words in a Subtitle Line.
- Searching a word from its Word Learning Status Popup.
Searching the Selected Text
This feature is currently only available on Supported Streaming Platforms and on Migaku Player.
Currently you must use Migaku Dictionary's Global Hotkeys if you would like to search selected/highlighted text on other websites.
You can search any text that you have selected by:
- Clicking the "Search" button that appears to the right of the currently displayed subtitle when hovered.
- Clicking the "Search" button that appears to the right a subtitle line in the Subtitle Browser.
Automatically Searching All Unknown Words in a Subtitle Line
This feature is exclusive to languages with Word Learning Status Support (currently only Japanese), and also only currently works on Supported Streaming Platforms and on Migaku Player.
To use this requires that your have already Parsed the Words Learning Statuses of the Main Language subtitles.
Once you have done so you can search all unknown words by either simply:
- Clicking the "Search" button that appears to the right of the currently displayed subtitle when hovered.
- Clicking the "Search" button that appears to the right a subtitle line in the Subtitle Browser.
Searching from Learning Status Popups
Once you have Parsed the Words Learning Statuses on a page, then hovering over a word on that page will cause a Word Learning Status Popup to appear.
In this popup, which is covered in more detail in its section of this guide, you will find a Search button in the top right corner, clicking that button will search the word appearing in the popup.
This functionality works on all pages where Word Learning Statuses are available.
Instant Flashcard Creation
There are several ways to make fast high quality SRS flashcards for Anki using the Immerse with Migaku Browser Extension and Migaku Dictionary. Let's take a look at them.
Currently instant flashcard creation is only for Supported Streaming Platforms and Migaku Player. On other sites you can use Migaku Dictionary's Global Hotkeys to create cards very quickly in a similar way to what is explained below.
Before you can create any cards you must Allow Recording in the Extension Menu.
_* If you have not yet installed Migaku Dictionary , please click this link to view its installation instructions.
Creating a Card from a Single Subtitle Line
There are two ways to create an Anki flashcard from a single subtitle line:
- Clicking the Anki button that appears to the right of the currently displayed subtitle when hovered.
- Clicking the Anki button that appears to the right a subtitle line in the Subtitle Browser.
Once the Anki button is clicked:
- The extension will automatically play the video, record the necessary audio, take a screenshot, and pause the video when it is finished.
- Then it will send the necessary information to Migaku Dictionary and its tCard Exporter will be opened.
- Please reference the Card Exporter section of the Migaku Dictionary Add-on's Manual if you are not familiar with using the Card Exporter.
Migaku Dictionary's Dictionary Window must be open for card creation to work.
Creating a Card from Multiple Subtitle Lines
To create a single Anki flashcard from multiple subtitle lines:
- Open the Subtitle Browser
- Left click the timestamps of the subtitles you would like to make a single card for.
- The subtitles must be connected. You cannot have unselected subtitles in between selections.
- Click any of the Anki buttons in the Subtitle Browser.
Once the Anki button is clicked:
- The extension will automatically play the video, record the necessary audio, take a screenshot, and pause the video when it is finished.
- Then it will send the necessary information to Migaku Dictionary and its tCard Exporter will be opened.
- Please reference the Card Exporter section of the Migaku Dictionary Add-on's Manual if you are not familiar with using the Card Exporter.
Migaku Dictionary's Dictionary Window must be open for card creation to work.
Creating Cards in Bulk
The Immerse with Migaku Browser Extension allows you to create Anki flashcards in bulk.
You can currently create cards in bulk for:
If you are using an older version of Migaku Dictionary:
1. You must check off "Add Extension/Netflix Cards Automatically" in the Card Exporter for the cards to be actually added to your collection.
2. If you are bulk exporting cards on subtitles that have been parsed, then you should enable Single-Tab Mode in the Dictionary Window to avoid the add-on opening many tabs when performin Automatic Searching When Adding Flashcards.
* This has been fixed in versions > 1.1.041 for Anki 2.1.22-23, and > 1.2.0 for Anki 2.1.35.
Creating a Card for All Subtitle Lines
To automatically create a card for every subtitle line in a show:
- Press the "Export All" button on the Migaku Toolbar.
After the button is clicked:
- The audio of the program will be muted.
- The recording will begin and proceed until completed.
Currently there is no progress bar to show you the percentage completed, this will be implemented soon.
You can cancel bulk exporting at any time by refreshing the page.
* Please note that Google Chrome (and other Chromium-based browsers) requires the tab being recorded to remain in focus in order to take screenshots. As a result you cannot use another tab or another window of your internet browser while performing bulk card creation. If you would like to surf the internet while your cards are created please install and use a different internet browser during that time. If you unfocus the tab, then screenshots will not be taken.
Migaku Dictionary's Dictionary Window must be open for card creation to work.
Creating a Card for All 1 Target Subtitle Lines
To automatically create a card for all 1 Target subtitle lines (subtitle lines that have only a single unknown word):
- Parse the Words Learning Statuses of the subtitles.
- This requires a language that supports Word Learning Statuses.
- Press the "Export 1T" button on the Migaku Toolbar.
After the button is clicked:
- The audio of the program will be muted.
- The recording will begin and proceed until completed.
Currently there is no progress bar to show you the percentage completed, this will be implemented soon.
You can cancel bulk exporting at any time by refreshing the page.
* Please note that Google Chrome (and other Chromium-based browsers) requires the tab being recorded to remain in focus in order to take screenshots. As a result you cannot use another tab or another window of your internet browser while performing bulk card creation. If you would like to surf the internet while your cards are created please install and use a different internet browser during that time. If you unfocus the tab, then screenshots will not be taken.
Migaku Dictionary's Dictionary Window must be open for card creation to work.
Automatic Searching When Adding Flashcards
If you have Parsed the Words Learning Statuses for the subtitles you are adding cards for then:
- All unknown words in a sentence will automatically be searched
- The first unknown word will be added to the Card Exporter's Word Field automatically.
Subtitle Related Features
There are various features related to subtitle files that add functionality to Supported Streaming Platforms and Migaku Player.
Dual Subtitle Tracks
The Immerse with Migaku Browser Extensions allows you to select a Main Language subtitle track and a Secondary Language subtitle track.
You can find out more about this in this section of the guide.
Subtitle Modes
The Migaku Toolbar on Supported Streaming Sites and the Migaku Player page has support for multiple Subtitle Modes.

A Subtitle Mode is a particular way of displaying subtitles in such a way that it is more useful for language learning.
There are four subtitle modes:
-
Default - Shows subtitles as they would normally appear on any subtitled content.
- Reading
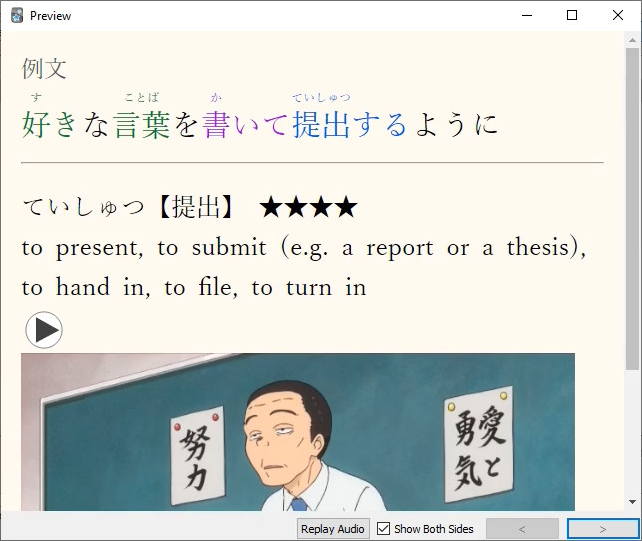
- Pauses the video at the beginning of a subtitle line so that the learner may read that subtitle line before listening to the audio for that subtitle line.
- Recall
- Hides the subtitle line until the audio is finished playing then displays it and pauses the video. This allows a learner to listen to the audio of a subtitle line before reading that line and confirming whether they heard it correctly or not.
- You will notice that the video seems to jump back a bit before displaying the subtitle, that is to ensure that the audio for the next subtitle line plays from the beginning.
- Hidden
- Only shows the subtitles when the video is paused. This allows a learner to focus on listening and pause the video when they want to check the subtitles.
Skip Mode
The Migaku Toolbar on Supported Streaming Sites and the Migaku Player page has support for Skip Mode.
Skip Mode allows you to change the speed the video plays at when a subtitle hasn't been on the screen for at least 1 second, in effect fast forwarding through parts of the video that do not have dialogue. This is particularly useful when rewatching content to practice one's listening.
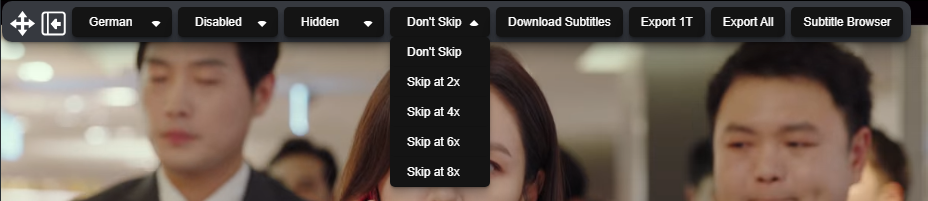
There are 5 options available:
- Don't Skip
- The video will always play at the same speed.
- Skip at 2x
- The video will play at 2x speen when there are no subtitles on screen.
- Skip at 4x
- The video will play at 4x speen when there are no subtitles on screen.
- Skip at 6x
- The video will play at 6x speen when there are no subtitles on screen.
- Skip at 8x
- The video will play at 8x speen when there are no subtitles on screen.
Downloading Subtitles
The Migaku Toolbar on Supported Streaming Sites and the Migaku Player page has a "Download Subtitles" button, pressing this button will download the subtitle selected in the Main Language Selector.
If you retime a subtitle you have loaded you can then use the "Download Button" to download a version of the retimed subtitle for later use.
Loading Local Subtitles
Clicking the Subtitle Settings Button which appears when you hover over the top right corner of the video player will open the Subtitle Adjustment Window.

There is one subwindow for the Main Subtitle and one for the Secondary Subtitle. In each subwindow the top three options are related to loading in a local subtitle file.
In order to load local subtitles:
- Click the "Select SRT File(s)" button and select 1 or more
.srtsubtitle files. - In the language drop-down select the language of the subtitles.
- If the language you select here has Extra Functionality then when this subtitle is selected you will have access to that functionality.
- "Other" is a blanket option covering all other languages that currently have no Extra Functionality.
- Click the "Import SRT" file to import the file(s).
Retiming Subtitles You Have Loaded
Clicking the Subtitle Settings Button which appears when you hover over the top right corner of the video player will open the Subtitle Adjustment Window.

There is one subwindow for the Main Subtitle and one for the Secondary Subtitle. In each subwindow the bottom two options are related to retiming a subtitle. It is important to remember that you can only retime subtitles that you have loaded in yourself.
In order to retime a locally loaded subtitle file:
- Ensure you have correctly selected the subtitle you want to retime in the Main/Secondary Language Selector
- Input the a number in milliseconds of the offset that you wish to apply to the subtitles.
- A positive number will move the subtitles towards the end of the video.
- A negative number will move the subtitles towards the beginning of the video.
- Click the "Adjust Timings" button, to update the subtitles timing.
- You will see the "current Adjustement (ms)" value update to reflect the changes you have made.
Word Learning Statuses
Word Learning Statuses are a way of keeping track of the words you "Known", the words you are "Learning", and the words that are still "Unknown" to you.
In fact the three learning statuses are just that.
- Known - Words you know.
- Seen - Words you have begun studying or have seen recently, but don't know well yet.
- Unknown - Words you don't know yet
Supported Languages
The current list of languages that supports Words Learning Statuses:
- Japanese
Parsing the Learning Statuses in Subtitles or on a Website

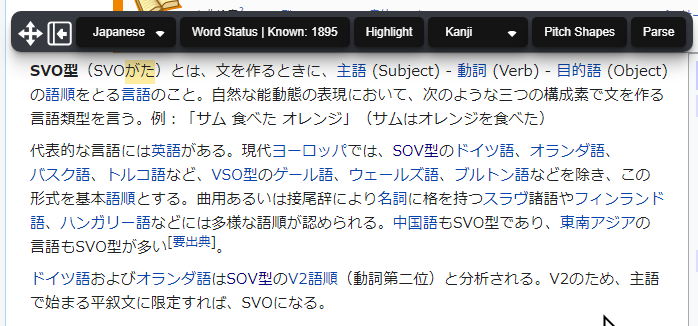
When you select a language that supports learning statuses, you will see two buttons added to the Migaku Toolbar:
- The "Word Status | Known: 0" Button
- This is a toggleable option that enables/disables Learning Status Underlining.
- The button's text will become green when it is enabled.
- The "Parse" Button
- Clicking this button will both parse the words in a subtitle or on a website to apply Word Learning Status Information to them, and will also apply Extra Features if the Main Language selected has them.
When the "Word Status | Known: x" button is toggled on (text is green) and you hit the parse button then you the text will be rendered with Learning Status Underlining.
When the "Word Status | Known: x" button is toggled off (text is white) and you hit the parse button then you the text will be rendered without Learning Status Underlining. However, if you hover over a word you will see in the Word Learning Status Popup that Word Learning Statuses have still been applied to the parsed words. The only difference is that that information is not displayed with underlining.
You currently must reload a page if you would like to re-parse it with different settings selected.
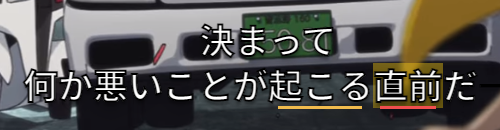
Learning Status Underlining
The 3 different Learning Statuses are displayed as follows when underlining is enabled:
- Known
- No underline is shown on Known words until that word is hovered, then a green underline is shown.
- Seen
- A light orange underline signifies the Seen Learning Status
- Unknown
- A red underline signifies the Unknown Learning Status
The Word Learning Status Popup
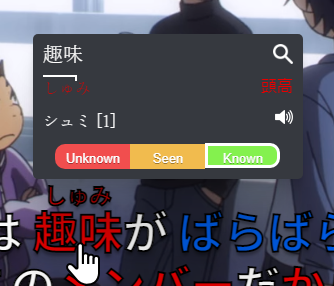
After you have Parsed the Words Learning Statuses of subtitles or a website, the Word Learning Status Popup will then display when a word is hovered.
By default the popup contains the following information:
- The dictionary form of the hovered word.
- A search icon in the top right that will search the dictionary form when clicked.
- Three Buttons for each of the Learning Statuses.
- The button for the current Learning Status of the word has a white border.
Along with this information, extra language dependent information may also be shown as well. Check out the Extra Features section to find out about what other information will be displayed here for different languages.
Changing the Learning Status of a Word
Clicking one of the three Learning Statuses in the Word Learning Status Popup will change the learning status of that word to the Learning Status that was clicked.
Importing Learning Statuses From Anki
Importing Instructions:
- Navigate to the Word Data Tab of the Settings Page.
- Press the "Import Words From Anki" button.
- You will then see the Card Type Options Window which is covered in the next section.
Card Type Options
 Once you've selected your
 collection.anki2 file, you will see the Card Type Options Window.
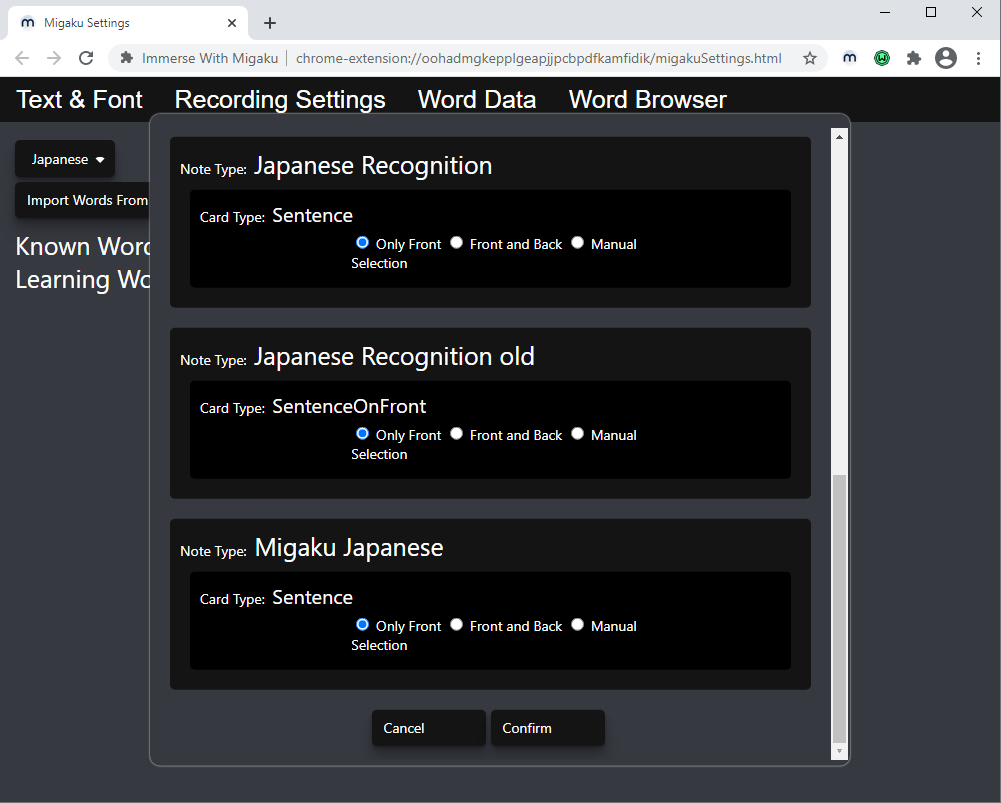
The Card Type Options Window allows you to customize which Card Types are imported, and which Fields from those Card Types are imported.
The Card Type Options Window Contains the following options:
- The Known Interval
- This is the first option you will see at the top of the window. The Known Interval is the number of days the interval of a card must be, for the words imported from that card to be considered Known. Words from cards with an interval less than the Known Interval will be considered Seen.
- If a word is found on both a card with an interval of 21 days and a card with an interval of less than 21 days, then the word is considered Known.
- Leaving the default value of 21 is recommended. 21 is the number of day the interval of a card must be in Anki to be considered a Mature Card.
- This is the first option you will see at the top of the window. The Known Interval is the number of days the interval of a card must be, for the words imported from that card to be considered Known. Words from cards with an interval less than the Known Interval will be considered Seen.
- An Option Group for each Card Type in your collection organized by that Card Type's Note Type.
- Each Card Type has three possible options:
- Only Front
- Will import the words found in all Fields that are shown on the Front Side of the Card.
- Front and Back
- Will import the words found in all Fields that are shown on the Front Side of the Card and the Back Side of the Card.
- Manual Selection
- Allows you to individually select the Fields whose words will be imported.
- Only Front
- Each Card Type has three possible options:
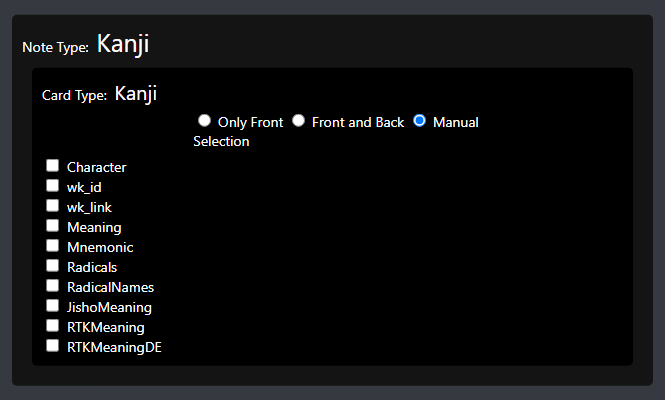
To not import words from a Card Type:
- Select Manual Selection but do not select any fields to import.
If you are studying Chinese or Japanese it is recommended that you do not import any Kanji/Hanzi decks as they will lead to innacurate Known and Learned Word Counts.
After you've set up which Card Types you would like to import then you can hit the "Confirm" button at the bottom of the screen.
- Hit the confirm button only once.
- Currently a progress bar is not implemented it may appear as if nothing is happening.
When the process is finished you will see your Known Word and Learning Word Count update to reflect your knowledge from Anki.
Updating Your Word List
When you import words from Anki the known words from Anki are combined with your current Word List allowing you to update your list with new words learned in Anki at any time.
How Word Lists are Combined
Word Lists are combined in a very simple way. If a word that is being imported has a Learning Status that is more "Known" than the current Learning Status for that word in your Word List then it will be updated.
For example, if the word 磨く (Migaku), was an Unknown, or Seen word in your word list but was used in a card on Anki with an interval greater than or equal to 21 days then its learning status would be updated to Known.
Extra Features
Extra features are language exclusive bonus features that should make studying a particular language more effective and efficient.
Extra Features for Japanese

There are three Extra Feature Buttons added to the Migaku Toolbar when Japanese is selected:
- The Highlight Button
- A toggleable button that allows you to Enable/Disable Pitch Accent Coloring (the text is green when enabled).
- The Display Mode Drop-Down Menu
- Allows you select a Japanese Display Mode.
- Pitch Shapes
- A toggleable button that allows you to Enable/Disable Pitch Shapes (the text is green when enabled).
Once you have enabled or disabled Pitch Accent Coloring, and Pitch Shapes, and chosen a Japanese Display Mode, you can press parse to add the information to the subtitle or website's text.
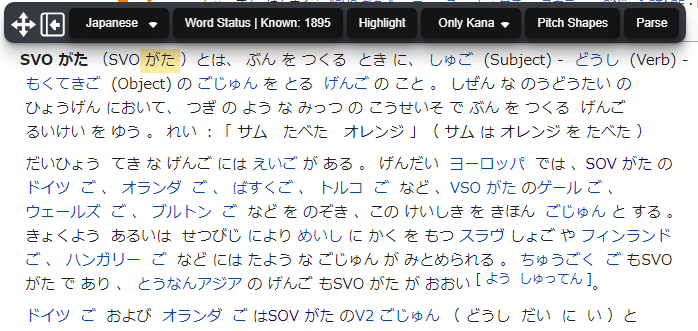
Parsing text with Pitch Accent Coloring, and Pitch Shapes enabled, and the Japanese Display Mode set to Furigana.
You currently must reload a page if you would like to re-parse it with different settings selected.
Pitch Accent Coloring
Please note that Pitch Accent Coloring applies on a per word basis within the extension. It is meant to help you learn the pitch accent of the dictionary form of the word. The actual pitch of the word may differ based on how it is conjugated, how it is used in a sentence, or where it is found within a sentence.
When the Highlight Button is toggled to enabled and the text of subtitles or a website is parsed, the Japanese words on that page will be colored according to their pitch accent pattern.
In standard Japanese, pitch accent has the following effect on words spoken in isolation:
- If the accent is on the first mora, then the pitch starts high, drops suddenly on the second mora, then levels out. The pitch may fall across both morae, or mostly on one or the other (depending on the sequence of sounds)—that is, the first mora may end with a high falling pitch, or the second may begin with a (low) falling pitch, but the first mora will be considered accented regardless. The Japanese describe this as 頭高(あたまだか)/Atamadaka (literally, "head-high").
Atamadaka words are colored red by default.
- If the accent is on a mora other than the first or the last, then the pitch has an initial rise from a low starting point, reaches a near-maximum at the accented mora, then drops suddenly on any following morae. This accent is referred to as 中高(なかだか)/Nakadaka ("middle-high").
Nakadaka words are colored light orange by default.
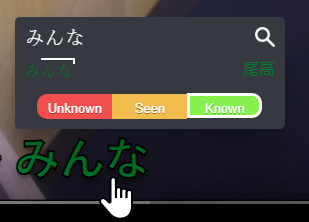
- If the word has an accent on the last mora, the pitch rises from a low start up to a high pitch on the last mora. Words with this accent are especially distinguishable from accent-less words because the pitch immediately drops on a following particle such as が ga or に ni. In Japanese this accent is called 尾高(おだか)/Odaka ("tail-high").
Odaka words are colored green by default.
- If the word doesn't have an accent, the pitch rises from a low starting point on the first mora or two, and then levels out in the middle of the speaker's range, without ever reaching the high tone of an accented mora. In Japanese this accent is named 平板(へいばん)/Heiban ("flat-board").
Heiban words are colored blue by default.
* Heiban is by far the most common pattern.
A Special Note About Verbs and Adjectives
Please note that Pitch Accent Coloring applies on a per word basis within the extension. It is meant to help you learn the pitch accent of the dictionary form of the word. The actual pitch of the word may differ based on how it is conjugated, how it is used in a sentence, or where it is found within a sentence.
Verbs and Adjectives in Japanese are either Heiban or have a drop 2 moras from their final mora.
Since this rule applies to all verbs and adjectives in Japanese we can make a more simple distinction in pitch for verbs and adjectives. They have one of two patterns:
- Heiban - Colored Blue
- Means that the unconjugated dictionary form of this word is Heiban.
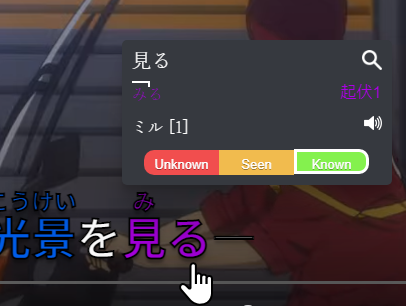
- 起伏(きふく)/Kifuku ("rise-fall")
- Means that the unconjugated dictionary form has a drop. (You can hover a word to see where the drop occurs.)
Kifuku verbs and adjectives are colored purple by default.
Compound Words with 2 Patterns
There are some words that have more than one pitch accent within the same word itself. This happens when the word in question is actually a compound word made up of 2 words that each have a different pitch accent. This most often happens with four character compounds.
When the extension runs across such a word it is incapable of breaking the larger compound word down into its 2 base words and applying a pitch accent to each of them. (The required information to split the base words at their boundaries accurately does not exist within the extension's dataset and therefore it is not possible.)
Instead the extension will make it known to the user that this word is a compound word and that each of its base words has a different accent.
Let's take a look at how it does this:
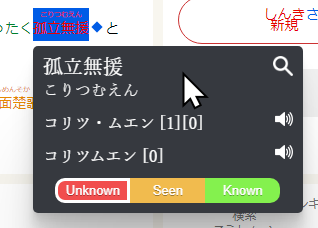
The above word "孤立無援" is made up of 2 different words "孤立" and "無援". In the compound word "孤立無援", there are 2 accents that are pronounced (just as if you were saying the 2 base words independently). "孤孤" is Atamada, while "無援" is Heiban. Since the extension cannot accurately split words at their boundaries it will instead:
- Color the text of the compound word, the color of the pitch accent of the first word.
- Give the compound word a background, that is the color of the pitch accent of the second word.
This can very rarely lead to a word becoming unreadable unless it is hovered, on the occassion that both base words have the same pitch accent:
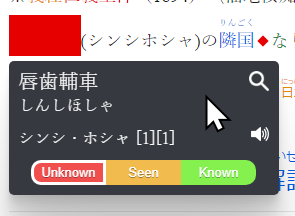 We can see that the word "唇歯輔車" becomes obscured because both of its base words have the Atamadaka pattern, making both the text and the background red. This will be fixed in a future update.
Japanese Display Modes
There are 3 Display Modes:
- Kanji
- The text is displayed as it normally is.
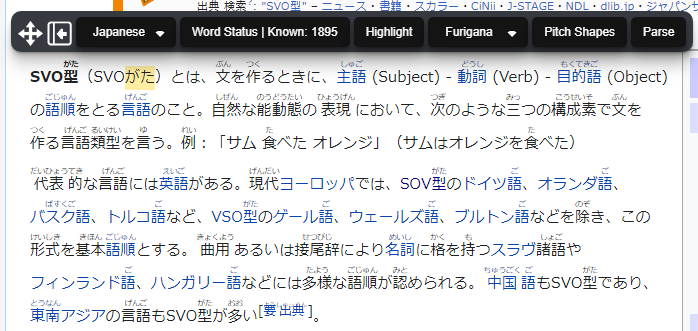
- Furigana
- Readings are added above words when applicable.
- Only Kana
- Words are replaced by their readings in kana, making the text "Only Kana".
Pitch Shapes
Pitch Shapes are visual cues ("Shapes") added after a word to call attention to the learner that that word has multiple potential pitch accents. There will be one Pitch Shape for each variant pitch accent that a word has.
There are 2 Pitch Shapes:
- A Diamond
- A Pitch Diamond will always be one solid color, mapping to the color of the variant pitch accent.
- A Circle
- A Pitch Circle will always be 2 colors and signifies that the variant pitch accent is a compound word and each of that compound word's base words have a different accent. See Compound Words with 2 Patterns.
Click a Word to Play Audio
If you installed the accentAudio folder when installing the extension then at any time you can click a word to play the audio for that word. Please note that audio is not available for all words however.
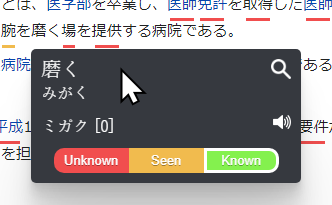
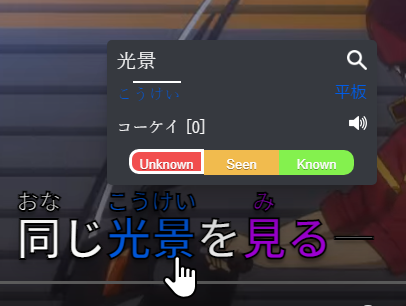
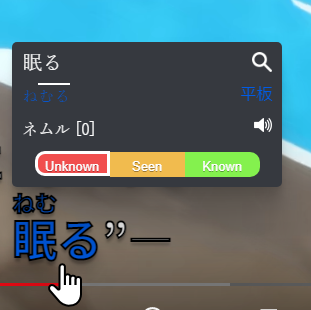
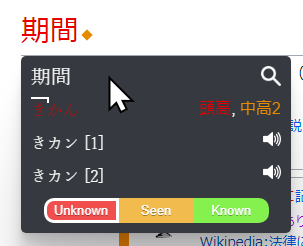
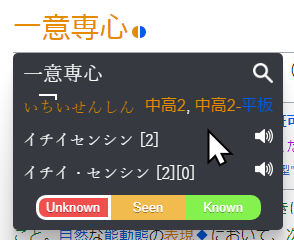
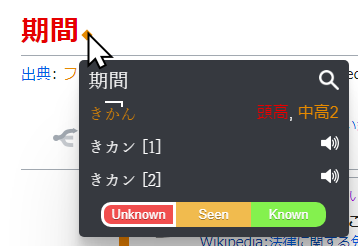
Extra Features on the Learning Status Popup
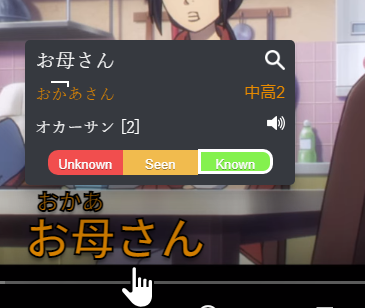
Some extra information (when available) is added to the Word Learning Status Popup when the Main Language is set to Japanese:
- The dictionary form colored with its pitch accent coloring with a bar showing where the pitch drops.
- The pitch accent pattern written in Japanese ("平板", "頭高", "中高", "尾高", "起伏"), again in the color of that pattern.
- The pitch accent dictionary entry for the dictionary form of the word with the number pitch accent notation used in Japanese dictionaries (
[0],[1],[2], etc.). - A speaker icon that when clicked will play the audio of the dictionary form.
Extra Features for Other Languages
Currently there are extra features for:
CantoneseEnglishFrenchGermanJapaneseMandarinPortugueseSpanish
Extra features are coming to other languages in the very near future!