Migaku Japanese User's Manual
Table of Contents
- Intro
- Installation
- Updating
- Uninstalling
- Major Features
- Settings
- Reference
Intro
Migaku Japanese is an Anki add-on that provides a host of features that makes studying Japanese more fun, convenient, and efficient. Some of Migaku Japanese's main features include automatic reading (furigana) generation, audio recordings for the vast majority of words, and Pitch Accent Coloring which makes learning the high and low tone changes of Japanese a lot easier.
One of the best parts of Migaku Japanese is that most of these features work across all Anki platforms, including the computer version, AnkiWeb, Anki Mobile, and AnkiDroid!
We hope you find this add-on helpful! If you are in a position where you are financially able please consider supporting the Migaku Team! Our software projects take thousands of hours to build, update, and maintain and we are only able to continue our work thanks to our supporters! We are deeply and humbly grateful to everyone who decides to support Migaku!
Installation
If you have not yet installed Anki and need help then please click here to find out how to install an Anki version compatible with the Migaku Toolset.
If you are new to Anki, we suggest you to read our Anki Quick Start Guide which covers all of the fundamentals of Anki from the perspective of a language learner.
Ensuring You Have the Correct Anki Version
The current recommended version of Anki for those using the Migaku Add-on series is Anki 2.1.35.
* A legacy version of the Migaku Add-on series is also available for Anki 2.1.22-23. But those versions are no longer updated or maintained, and support cannot be offered for them. If you wish to receive support then please ensure you are using the recommended version of Anki.
If you have not yet downloaded Anki, please visit our Anki download page to ensure you download the correct version of Anki for your operating system.
You can check your Anki version on Windows by:
- Navigating to
Help->About...from Anki's top menu bar. - Your Version Number will be listed on the 3rd line of the "About Anki" window.
You can check your Anki version on Mac by:
- Navigating to
Anki->About...from Anki's top menu bar. - Your Version Number will be listed on the 3rd line of the "About Anki" window.
Installing the Add-on
Migaku Japanese can be installed the same way as any other Anki add-on.
You do this by pasting Migaku Japanese's installation Code into Anki's "Install Add-on" window. You can access this window by navigating Tools->Add-ons->Get Add-on's from Anki's top menu.
Migaku Japanese's installation code is 278530045.
Installing the Audio Files
In order to install the audio files needed to download and add the accentAudio folder into your Migaku Japanese installation.
First you must download the accentAudio.zip file.
Once you have downloaded the ZIP file you must add it to the user_files folder of your Migaku Japanese installation folder.
You can reach your [Migaku Japanese Installation Folder]/user_files folder by:
- Navigating to
Tools->Add-onsfrom Anki's top menu bar. - Selecting the Migaku Japanese Add-on in the add-on list.
- Clicking the "View Files" button.
- Navigating to your
user_filesfrom the Migaku Japanese installation folder.
To install the audio files into the user_files folder:
- Unzip the contents of
accentAudio.zip, which is a single folder calledaccentAudio, into theuser_filesfolder.- The path to the audio files will then be
[Migaku Japanese Installation Folder]/user_files/accentAudio/[Audio Files]
- The path to the audio files will then be
Once you have done this the Audio Features should now work properly.
Updating
To update Migaku Japanese:
- Navigate to
Tools->Add-onsfrom Anki's top menu bar. - Click the "Check for Updates" button.
- If an update is found you will be notified and asked if you would like to update. Confirm the update.
- Restart Anki to begin using the update.
Uninstalling
To uninstall Migaku Japanese:
- Navigate to
Tools->Add-onsfrom Anki's top menu bar. - Select "Migaku Japanese".
- Click "Delete"
- Restart Anki.
Major Features
Migaku Japanese has many useful features that will help you on your Japanese learning journey.
The Migaku Japanese Note Type
Migaku Japanese will automatically add the Migaku Japanese Note Type to your Anki Collection if a Note Type by the same name doesn't already exist.
The Migaku Japanese Add-on comes out of the box configured to work with the Migaku Japanese Note Type.
* You can prevent the add-on from automatically adding the Migaku Japanese Note Type by disabling its associated setting on the Settings Window.
How to use the Note Type
The Migaku Japanese Note Type is a note type designed to be used with either Sentence Cards or Audio Cards.
**We are currently planning on adding out-of-the-box support for other varieties of cards as well, such as Vocabulary Cards, and Kanji Cards. **
These are the Fields found on the Migaku Japanese Note Type:
- Expression
- This is the field where the sentence goes.
- Meaning
- This is the field where any definitions or images go.
- Audio
- Where the audio of the card goes.
- Audio on Front
- A Conditional Field that when empty will display the card as a Sentence Card, and if it has any content at all will display the card as an Audio Card
- This field is hidden, and not visible either on the Front of the Card or the Back of the Card when being reviewed.
The Migaku Japanese Note Type is somewhat unique in that its "Audio on Front" field is a Conditional Field, when it is empty the card will display as a Sentence Card with the "Expression" field on the Front of the Card, but if the content of that field is not completely empty then the card will be displayed as an Audio Card with the "Audio" field being displayed on the Front of the Card:
Toggling between a Sentence Card and an Audio Card by filling in or deleting the contents of the "Audio on Front" field.
Converting Your Cards to the Migaku Japanese Note Type
The fastest way to get started using the Migaku Japanese Add-on is to convert your existing Sentence Cards to the Migaku Japanese Note Type. If you are also studying Vocabulary Cards, or other card varieties, then it is recommended that you do not convert them to the Migaku Japanese Note Type and instead configure those Note Types to work with the Migaku Japanese Add-on.
* Please note that if you use Note Types that have multiple Card Types associated with them that you also should not convert them to the Migaku Japanese Note Type, and you should similarly configure your them to work with the Migaku Japanese Add-on.
If you will be converting cards from a Note Type that has a separate field for images, then you should first add an Image Field to the Migaku Japanese Note Type before converting your cards.
To convert your cards to the Migaku Japanese Note Type:
- Open Anki's Card Browser
- Select a Note Type from the Filter List on the left side of the Card Browser Window
- You can only convert cards of a single Note Type at a time, so we use the filter list to ensure we are only selecting the cards of one Note Type at a time.
- Select all of the cards of that Note Type by pressing "Ctrl+A" ("⌘+A" on Mac).
- Right click one of the selected cards, and then click "Change Note Type..." in the drop-down menu that appears.
- In the "Change Note Type" Window, select "Migaku Japanese" for the "New Note Type" value.
- In the "Fields" section at the bottom of the "Change Note Type" Window.
- Assign the sentence field from your cards to the "Expression" field.
- Assign the field that holds definitions on your card to the "Meaning" field.
- Assign the field that has audio on your cards to the "Audio" field.
- (Optionally) if you have an image field on your cards and have added an Image Field to the Migaku Japanese Note Type, then assign the Image field on your cards to the Image field you created on the Migaku Japanese Note Type.
- Make sure to not assign anything to the "Audio on Front' field of the Migaku Japanese Note Type.
If you don't wish to use the Migaku Japanese Note Type or have cards that aren't Sentence Cards that you would like to use with the Migaku Japanese Add-on, you can instead add Migaku Japanese support to your own Note Types using the Active Fields Tab of the Settings Window.
The Migaku Syntax
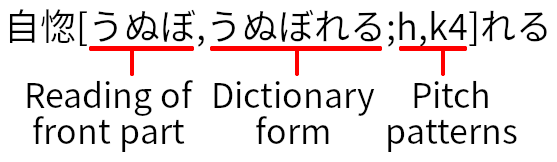
Understanding the Migaku Japanese Syntax is an essential part of getting the most out of the Migaku Japanese Add-on. Luckily, the syntax is relatively easy to understand, it has 3 components:
- The Reading
- The Dictionary Form Reading
- For verbs and adjectives only.
- The Pitch Accent(s)
The syntax is as follows:
Word[Reading(,Dictionary Form Reading);pitch-accent(s)](Word-Suffix)
An example with a verb:
走[はしり,はしる;k2]ります
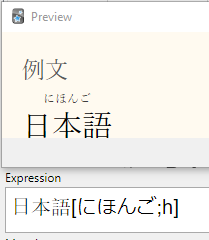
An example with a noun:
日本語[にほんご;h]
* The syntax itself is also surrounded by a single space character " " (unless it is at the beginning or ending value in a card's field's contents).
The Reading
The Reading portion of the syntax is the text that will be shown as Furigana for the word in question:
The Reading is either followed by a comma and the Dictionary Form Reading (applies to verbs and adjectives):
Reading,Dictionary Form Reading
Or it is followed by a semicolon and the Pitch Accent(s):
Reading;Pitch Accent(s)
The Dictionary Form Reading
The Dictionary Form Reading will only ever be generated for verbs and adjectives. An example with a verb:
走[はしり,はしる;k2]ります
The reason a Dictionary Form Reading is part of the syntax is because pitch accent information for verb and adjective conjugations is not currently implemented withing the add-on. The verb and adjective pitch accent information applies to the Dictionary Form (for example 走る and not 走ります) of the word and thus the add-on generates the Dictionary Form Reading of adjectives and verbs so that a Pitch Accent Graph Popup for the Dictionary Form of the word can be shown when the word is hovered:
The Pitch Accent(s)
There are 5 different Pitch Accent Patterns used in the Migaku Japanese Add-on, and each of those patterns are represented by a letter:
- h: 平板(へいばん)/Heiban
- a: 頭高(あたまだか)/Atamadaka
- n: 中高(なかだか)/Nakadaka
- o: 尾高(おだか)/Odaka
- k: 起伏(きふく)/Kifuku
If you are not familiar with Japanese pitch accent and what these patterns mean please check the reference section about Pitch Accent Patterns
An important note when it comes to verbs and adjectives:
The pitch accent value shown only applies to the dictionary form of the verb, and not to the particular conjugated form you are seeing. We do plan to eventually add verb and adjective conjugation pitch accent support to the add-on in the future though.
The Pitch Accent syntax will always come between a semicolon and a closing square bracket:
;Pitch Accent Syntax]
The syntax itself allows for expressing words that have pitch accent variants, and even compound words with multiple pitch accents within that single word.
Let's take a look at an example of the syntax for a word with a single pitch accent, then a word with pitch accent variants, and finally a compound word with multiple pitch accents with that same word:
- A word with a single pitch accent:
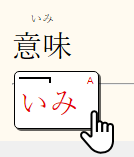
意味[いみ;a]意味is always 頭高(あたまだか)/Atamadaka.
- A word with pitch accent variants:
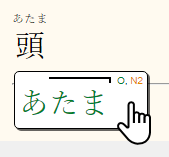
頭[あたま;o,n2]頭is either 尾高(おだか)/Odaka or its variant of 中高(なかだか)/Nakadaka- We also notice that the
nis followed by a2, this means that the drop happens after the 2nd kana character/mora when頭is 中高(なかだか)/Nakadaka. You can find out more about these numbers in this section Special Nakadaka and Kifuku Syntax.
- A word with a single pitch accent:
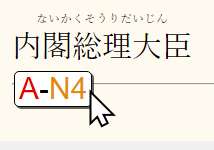
内閣総理大臣[ないかくそうりだいじん;an4]内閣総理大臣is a compound word that has 2 pitch accents.内閣is 頭高(あたまだか)/Atamadaka総理大臣is 中高(なかだか)/Nakadaka- The add-on however does not have the necessary data to correctly display this, to find out more about how these types of words are displayed please view the reference section about Compound Words with 2 Patterns.
You can find out more about how this syntax is displayed by reading the sections about Pitch Accent Coloring, Pitch Accent Shapes, and Pitch Accent Graph Popup on Hover.
Special Nakadaka and Kifuku Syntax
中高(なかだか)/Nakadaka and 起伏(きふく)/Kifuku words have a drop somewhere within the word. In order to represent exactly which kana/mora this drop will happen after a number is included after the letter that represents each pattern:
協力者[きょうりょくしゃ;n3]- The drop is after the 3rd mora.
考[かんが,かんがえる;k4,k3]えます- The drop is after the 4th or 3rd mora.
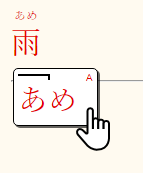
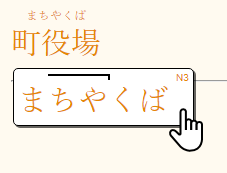
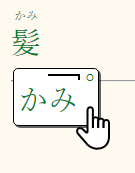
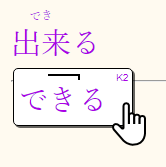
Pitch Accent Coloring
When a Display Type that supports Pitch Accent Coloring is applied to a field. Such as on the "Expression" and "Meaning" fields on the Back of the Card of the Migaku Japanese Note Type, then words will be colored according to the pitch accent of their dictionary form.
- 平板(へいばん)/Heiban words are colored in blue.
- 頭高(あたまだか)/Atamadaka words are colored in red.
- 中高(なかだか)/Nakadaka words are colored in light orange.
- 尾高(おだか)/Odaka words are colored in green.
- 起伏(きふく)/Kifuku words are colored in purple.
These colors can be changed in the Japanese Setting Window.
You can find out more information about Pitch Accent Patterns in their reference section.
 * Some compound words can have multiple pitch accent patterns within a single word. In such cases you might see the background of the word being colored along with the word's text as seen above. You can find out more about why this is in the Compound Words with 2 Patterns reference article.
Please remember that Pitch Accent Coloring applies on a per word basis. It is meant to help you learn the pitch accent of the dictionary form of the words on your cards. The actual pitch of the word may differ based on how it is conjugated, how it is used in a sentence, or where it is found within a sentence.
Pitch Accent Shapes
Pitch Accent Shapes are used to call attention to words that have multiple pitch accent variants. They can be enabled or disabled using the Display Shapes option in the Japanese Settings Window.
There are 2 types of pitch shapes:
- A Pitch Diamond
- One or more Pitch Diamonds are shown when a word's pitch accent variant(s) is a single Pitch Accent Pattern.
- A Pitch Diamond can be hovered to see a Pitch Accent Popup for that variant pattern.
- An example would be
頭[あたま;o,n2], the variant pattern beingn2.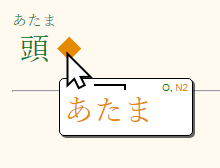
- A Pitch Circle
- One or more Pitch Circles are shown when a compound word has a variant that is made up of 2 pitch accents. You can find out more about in the Compound Words with 2 Patterns reference article.
- A Pitch Circle can be hovered to see a Pitch Accent Popup for that variant pattern, however no Pitch Accent Graph will be available.
- The first half of the pitch circle will be colored according to the first pattern of the variant, and the second half will be colored according to the second pattern of the variant.
- An example would be
一意専心[いちいせんしん;n2,n2h]the variant pattern beingn2h.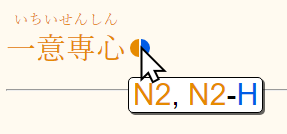
Pitch Accent Graph Popup on Hover
Pitch Accent Popups can be enabled or disabled using the Graph on Hover options in the Japanese Settings Window.
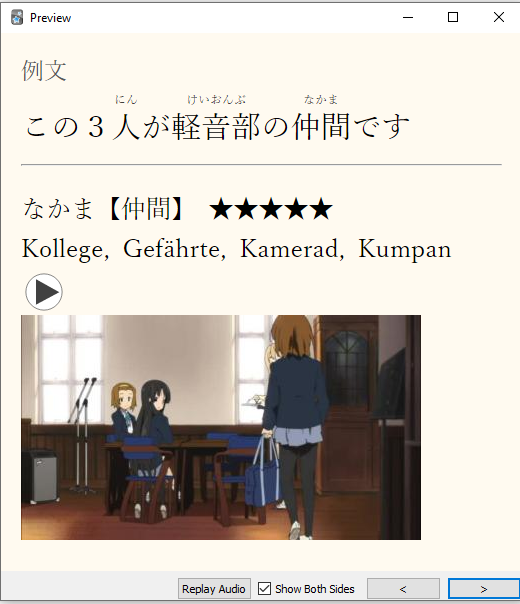
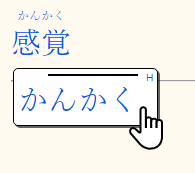
When enabled you will see a popup containing a Pitch Accent Graph of the word being hovered, and will also have letters signifying the pattern of the word that was hovered in the top right corner of that popup:
Pitch Graphs and Audio
You can add Pitch Graphs and Audio recording to fields that have been designated in the Pitch Graph Fields and Audio Fields of the Japanese Settings page respectively.
By Default when you highlight a word and press the Word Button both Pitch Graphs and Audio recordings for the selected word (if available), will be added to a field named "Audio" if it exists on the card being edited:
* You can change the add-ons settings to export to a field with a different name, or to only export Pitch Graphs or only Audio recording, or you can even export Pitch Graphs and Audio Recordings for every word in a sentence if you enable the Pitch Graphs and Audio option for the Sentence Button.
Clicking Words to Play Audio
If the Audio on Click option is enabled in the Japanese Settings Window, then when you click a word a recording of that word will be played (if available):
Generating the Migaku Syntax
The Migaku Japanese Add-on's core functionality relies on the Migaku Syntax to function. Migaku Japanese comes with various ways of generating this syntax for your cards.
Generating the Syntax for a Single Card

When you are adding or editing a card you will notice that 4 new buttons have been added to the Add Card Window or Card Editor's top menu.
The first 2 of these ("文" and "語") are related to generating the Migaku Syntax and/or Pitch Graphs and Audio for the card being edited or added.
The 3rd button is for Removing the Migaku Syntax, and the 4th button is to Add an Overwrite Rule which helps to automatically correct any mistakes the add-on makes.
The Sentence Button
The Sentence Button ("文") can be used to add the following information to cards:
- Readings
- Enabled by default
- Dictionary Form Readings (for Verbs and Adjectives)
- Enabled by default
- Pitch Accent Information
- Enabled by default
- Pitch Graphs
- Disabled by default
- Audio Recordings
- Disabled by default
You can enable or disable which of these are generated in the Sentence Button Option Group.
To use the Sentence Button, simply click within a field and click the Sentence Button ("文") (or press its hotkey "F2").
When the defaults setting are used, you will see that Readings, Dictionary Form Readings, and Pitch Accent Information are added to the selected field.
When all the information has been enabled, you will see that Pitch Graphs and Audio are also added to the card's Audio field.
The Word Button
The Word Button ("語") can be used to add the following information for a selected word to cards:
- Readings
- Disabled by default
- Dictionary Form Readings (for Verbs and Adjectives)
- Disabled by default
- Pitch Accent Information
- Disabled by default
- Pitch Graphs
- Enabled by default
- Audio Recordings
- Enabled by default
You can enable or disable which of these are generated in the Word Button Option Group.
To use the Sentence Button, either highlight a word within a field or click and place the cursor before a word (the longest word from that point will be found automatically), then click the Word Button ("語") (or press its hotkey "F3").
When the defaults setting are used, you will see that only Pitch Graphs and Audio for the selected word are added to the card's Audio field.
When all the information has been enabled, you will see that the Readings, Dictionary Form Readings, and Pitch Accent Information is added to the word that has been selected.
Removing the Syntax from a Single Card
Removing a syntax from a field is easy. Simply select a field, and click the Remove Migaku Syntax Button ("削") (or press its hotkey "F4").
You can also highlight some text within a field to remove the syntax just from that text:
Generating the Syntax for Many Cards
In order to generate the Migaku Syntax for many cards at once:
- Click the "Browse" button on Anki's Main Screen to open the Card Browser.
- Within the Card Browser select which cards you would like to add the Migaku Syntax to.
- Click the "Edit" button in the top left corner of the Card Browser and then click "Generate Readings/Accents/Audio".
- A "Generate Accents and Furigana" window will then popup.
- Select an "Origin" field.
- This is the field where the text that will have the syntax added to it will come from.
- Select what information you would like to add:
- Furigana = Readings
- Dict Form = Dictionary Form Readings
- Accents = Pitch Accent Information
- Audio = Audio Recordings
- Graphs = Pitch Graphs
- Select the "Destination" field where the the Migaku Syntax will be added.
- We recommend you to select the same field as the "Origin" field, because the Migaku Japanese add-on allows you to change how a field is displayed without needing to actually edit the contents of the field.
- Select the "Addition Mode", there are three of them:
- "Add" - Adds the Migaku Syntax to the bottom of the "Destination" field.
- "Overwrite" - Overwrites the current contents of the "Destination" field with the Migaku Syntax.
- "If Empty" - Will only add the Migaku Syntax to the "Destination" field if it is empty.
- We recommend using "Overwrite" and having the "Destination" and "Origin" fields be the same field.
- Click the "Execute" button.
Please note that if you select to export "Audio" and "Graphs" that the destination field for the audio recordings, and pitch graphs will counter-intuitively be the field(s) that have been selected in the Pitch Graph Fields and Audio Fields sections of the Japanese Settings Window. We plan to add a destination field for the Graphs and Audio "Generate Accents and Furigana" window and prevent this type of confusion in an upcoming update.
Removing the Syntax from Many Cards
In order to remove the Migaku Syntax from many cards at once:
- Click the "Browse" button on Anki's Main Screen to open the Card Browser.
- Within the Card Browser select which cards you would like to add the Migaku Syntax to.
- Click the "Edit" button in the top left corner of the Card Browser and then click "Generate Readings/Accents/Audio".
- A "Generate Accents and Furigana" window will then popup.
- Select an "Origin" field.
- This is the field the Migaku Syntax will be removed from.
- Click the "Remove Readings" button.
Using Spaces Within the Syntax
As stated in the Migaku Syntax section, spaces are used to mark the borders of words, and are not shown when the card is studied or reviewed. This can lead to some issues if you have fields that contain both English (or other languages that have spaces in between words), and Japanese words.
What will happen by default is that the spaces will be removed and your English text will not display correctly. Fixing this is simple however, simply generate the Migaku Syntax for a card where this issue is happening to resolve the issue:
Searching in the Card Browser
Because the Migaku Syntax adds brackets and various text to our words, it can make searches in our collection not return the expected results. We have however implemented a feature that will ignore the Migaku Syntax when searching for a word. You can use this feature by simply typing your search terms plus "nobr", which stands for "No Brackets". When "nobr" is typed along with your search terms the Migaku Syntax will be ignored and your search will return the expected results.
Handling Generation Mistakes
Migaku Japanese's parser is certainly not perfect, and although we plan to greatly improve it going forward, you will inevitably run across mistakes in the generated syntax. Luckily there are various strategies we can use to resolve these issues.
Manually Editing the Syntax
You can at any time edit the syntax of a card, and change any of the values of the Migaku Syntax. The changes you make will be instantly reflected when displaying the card. However, if the same word where the parsing issue occurred comes up again the add-on would once again make the same parsing mistake, and you would have to manually edit the contents of that card to fix the parsing mistake. To avoid these issues with manually fixing the parsing issues you come across you can instead add an Overwrite Rule. Overwrite Rules are automatically applied and will fix parsing mistakes for you automatically.
Adding Overwrite Rules
You can add a new Overwrite Rule by:
- Selecting the text that you would like to add a new Overwrite Rule for in the Add Card or Edit Card Window.
- Clicking the add Overwrite Rule button ("R+") (or press its hotkey "F5").
- The selected text will automatically be added to the "Original" field.
- Fill in the "Overwrite" field with the fixed syntax.
* You can also add an Overwrite Rule by navigating to Migaku->Add Parsing Overwrite Rule from Anki's top bar menu.
Dealing with Words Written the Same with Different Readings
A small percentage of words in Japanese are written the same way yet have different readings. Just one example is the word "玩具" which can be read both as "おもちゃ" and "がんぐ". Migaku Japanese will only ever parse this word as "おもちゃ" the much more common variant. This however leads you to be unable to look up the pitch accent or generate Pitch Graphs and Audio for "がんぐ". Migaku Japanese however provides you with a way to look up the variant word's pitch accent and generate Pitch Graphs and Audio for it.
To do this:
- First, see that when Migaku Japanese parses
玩具, it delivers the following result:玩具[おもちゃ;n2] - In order to manually overwrite the reading of "おもちゃ" to "がんぐ" we can:
- Replace "おもちゃ" with the letter "a" (meaning "alternate") followed by the reading we would like the add-on to use; "がんぐ".
- The result would then be
玩具[aがんぐ;n2] - Now you should highlight
玩具[aがんぐ;n2]or place your cursor before the character玩, and then press the Word Button "語".- If Readings, Dictionary Form Readings, and Pitch Accent Information are enabled for the Word Button then the add-on will overwrite the previous text of
玩具[aがんぐ;n2]with the correct data for "がんぐ", including its correct pitch accent;玩具[がんぐ;a]. - If Pitch Graphs and Audio Recordings are enabled for the Word Button then the add-on will generate the Pitch Graphs and Audio Recordings for "がんぐ" and send the Pitch Graph Fields and Audio Fields.
- If Readings, Dictionary Form Readings, and Pitch Accent Information are enabled for the Word Button then the add-on will overwrite the previous text of
Settings
To open the Japanese Settings Window:
- Navigate to
Migaku->Japanese Settingsin Anki's top menu.
If after making adjustments to any options you find that these changes are not reflected on AnkiWeb, Anki Mobile, or AnkiDroid then perform a full sync and those changes will be reflected.
Options Tab
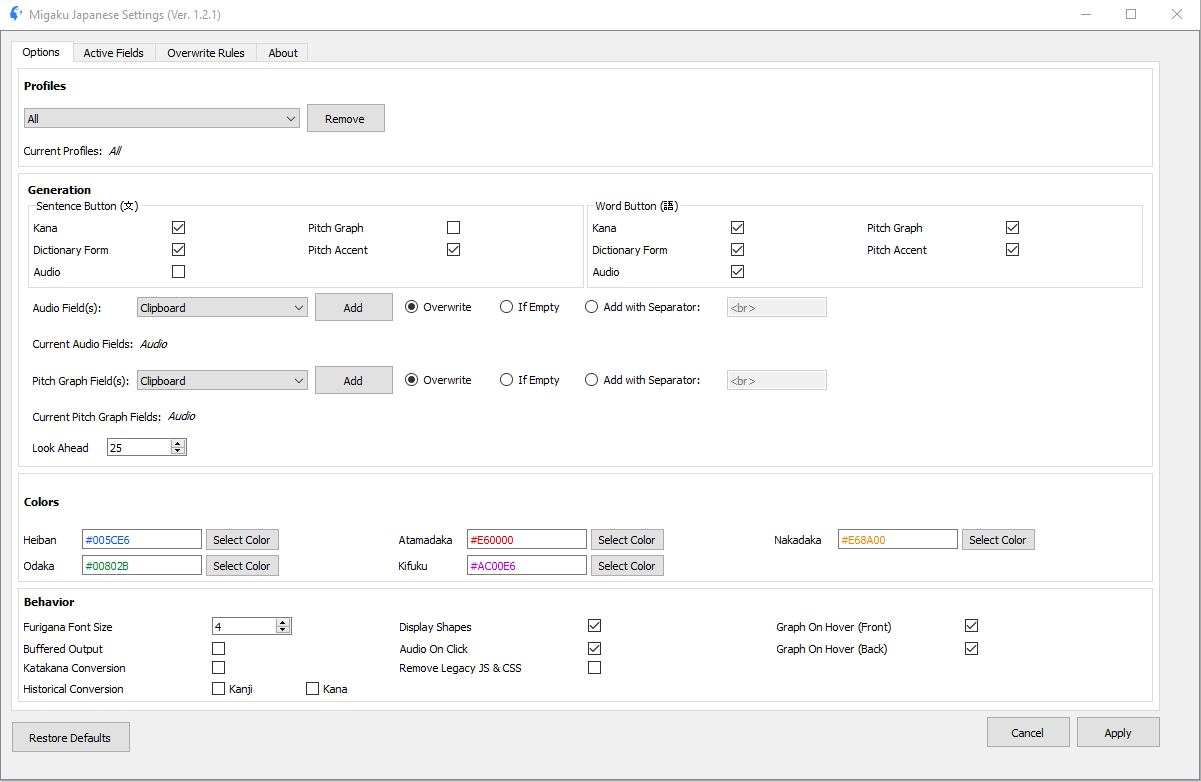
The Options Tab contains a variety of options that impact how Migaku Japanese functions.
Please note that you must hit the "Apply" button when you're finished making modifications to the settings for them to be saved.
Profiles
The Profiles drop-down select menu allows you to select which of your Anki Profiles Migaku Japanese is enabled on.
The Migaku Japanese buttons when editing cards, and the mass generation options will not show up on Profiles that are not enabled.
By default Migaku Japanese is enabled on "All" Profiles by default.
Generation Options
The Generation Options group contains the options that decide what content will be included when using the generation buttons.
Sentence Button

The Sentence Button Options Group allows you customize the behavior of the "Sentence Button (文)".
There are 5 different options which can be enabled:
- Kana
- Enabled by default.
- Adds readings to the generated Migaku Syntax for every word in the field where the button is pressed.
- Dictionary Form
- Enabled by default.
- Adds the Dictionary Form Readings for verbs and adjectives to the generated Migaku Syntax in the field where the button is pressed.
- Audio
- Disabled by default.
- Adds audio recordings to the Audio Field(s) you have selected (if those fields exist on the card where the button is pressed).
- Pitch Graph
- Disabled by default.
- Adds Pitch Graphs to the Pitch Graph Field(s) you have selected (if those fields exist on the card where the button is pressed).
- Pitch Accent
- Enabled by default.
- Adds the Pitch Accents to the generated Migaku Syntax in the field where the button is pressed.
Word Button

The Word Button Options Group allows you customize the behavior of the "Word Button (語)".
There are 5 different options with can be enabled:
- Kana
- Disabled by default.
- Adds readings to the generated Migaku Syntax to the selected word.
- Dictionary Form
- Disabled by default.
- Adds the Dictionary Form Readings to the selected word if it is a verb or an adjective.
- Audio
- Enabled by default.
- Adds audio recordings for the selected word to the Audio Field(s) you have selected (if those fields exist on the card where the button is pressed).
- Pitch Graph
- Enabled by default.
- Adds Pitch Graphs for the selected word to the Pitch Graph Field(s) you have selected (if those fields exist on the card where the button is pressed).
- Pitch Accent
- Disabled by default.
- Adds the Pitch Accents to the selected word.
* When using the Word Button you can either highlight the word you would like to have parsed by Migaku Japanese, or you can click into the field and have the next word that is found after the location of the cursor be parsed.
Audio Field(s)

Selects which fields the add-on will attempt to add audio recordings to when adding audio recordings to cards using the Sentence Button or the Word Button.
There are three modes that will add Audio to fields under different criteria:
- Overwrite
- If the field exists on the Card where the Sentence Button or Go Button is pressed, and the Audio option is enabled for that button, this will overwrite the contents of that field with the audio recordings for the word(s) that were in the field parsed by Migaku Japanese.
- If Empty
- If the field exists on the Card where the Sentence Button or Go Button is pressed, and the Audio option is enabled for that button, this will only add the audio recordings to that field if that field is currently empty.
- Add with Separator:
- If the field exists on the Card where the Sentence Button or Go Button is pressed, and the Audio option is enabled for that button, this will add the Separator (a single line break
<br>by default) first and then the audio recording to the selected field.
- If the field exists on the Card where the Sentence Button or Go Button is pressed, and the Audio option is enabled for that button, this will add the Separator (a single line break
If Empty is selected, audio will only be generated when the audio field is empty.
* If using the Sentence Button you must have "Audio" enabled in the Sentence Button Options Group, and if using the Word Button you must have "Audio" enabled in the Word Button Options Group.
Please note that while counter-intuitive, the Audio Fields(s) you have selected here are also the fields where audio recordings will be added when using Mass Generation. We plan to change this behavior in the future and add an Audio destination option to the Mass Generation Setting Window.
Pitch Graph Field(s)

Selects which fields the add-on will attempt to add Pitch Graphs to when adding Pitch Graphs to cards using the Sentence Button or the Word Button.
There are three modes that will add Pitch Graphs to fields under different criteria:
- Overwrite
- If the field exists on the Card where the Sentence Button or Go Button is pressed, and the Pitch Graph option is enabled for that button, this will overwrite the contents of that field with the audio recordings for the word(s) that were in the field parsed by Migaku Japanese.
- If Empty
- If the field exists on the Card where the Sentence Button or Go Button is pressed, and the Pitch Graph option is enabled for that button, this will only add the Pitch Graphs to that field if that field is currently empty.
- Add with Separator:
- If the field exists on the Card where the Sentence Button or Go Button is pressed, and the Pitch Graph option is enabled for that button, this will add the Separator (a single line break
<br>by default) first and then the audio recording to the selected field.
- If the field exists on the Card where the Sentence Button or Go Button is pressed, and the Pitch Graph option is enabled for that button, this will add the Separator (a single line break
If Empty is selected, audio will only be generated when the audio field is empty.
* If using the Sentence Button you must have "Audio" enabled in the Sentence Button Options Group, and if using the Word Button you must have "Audio" enabled in the Word Button Options Group.
Please note that while counter-intuitive, the Pitch Graph Fields(s) you have selected here are also the fields where Pitch Graphs will be added when using Mass Generation. We plan to change this behavior in the future and add a Pitch Graph destination option to the Mass Generation Setting Window.
Look Ahead
When the Word Button is clicked and the mouse cursor is placed within a field, the add-on will attempt to parse the longest word that occurs from the location of the cursor. For example, the word “内閣総理大臣” begins with the word “内閣”. What happens however if your place your cursor in front of “内閣総理大臣” and press the Word Button is that the add-on will parse the word “内閣総理大臣” because it is the longest word that it has found.
The Look Ahead option defines how far ahead the add-on will search when looking for the longest possible word. Although we recommend leaving it at the default value, if you find that the Word Button functionality is sluggish then you can reduce this value,.
Colors

In the Colors Options Group you can customize the colors that the Pitch Accent Patterns are shown in.
Behavior Options

The Behaviors Options Group mainly contains options that will affect both how Migaku Japanese generates and displays information.
Furigana Font Size
This is the size of the furigana font size in relation to the size of a word's text.
 For example, 1 is equal to 10% of the word's font size
 And 10 is equal to 100% of the word's font size.
Display Shapes
Whether or not Pitch Accent Shapes will be shown for words that have variant pitch accent patterns.
Graph on Hover
There are 2 "Graph on Hover" options, one for the Front Side of your cards ("Graph on Hover (Front)") and the other ("Graph on Hover (Back)") is for the Back Side of your cards.
When the option is enabled Pitch Accent Graph Popups will be shown on the particular side of the card that the option applies to.
Buffered Output
When Buffered Output is enabled, the The Migaku Syntax will be processed in parts rather than all at once.
The Buffered Output option should not be enabled except on the slowest computers and even then only if the text content of your cards are a thousand words or more in length.
Audio on Click
When checked will enable the Clicking Words to Play Audio feature.
This feature currently only works on the computer version of Anki.
Katakana Conversion

When Katakana Conversion is enabled, all Hiragana on your cards will be converted to Katakana.
This conversation is done in real-time using JavaScript and does not change the actual contents of the cards where it is applied. This means that you can enable this feature on occassion to practice reading Katakana and disable it when you're finished and you cards will be displayed as they originally were.
Katakana Conversion will be applied to all of your Active Fields, if you would like the content of a field to be converted to Katakana you must add that field to your Active Fields List.
This feature works across all platforms including AnkiWeb, Anki Mobile, and AnkiDroid. If you find that a change to this setting is not reflected on AnkiWeb, Anki Mobile, or AnkiDroid then perform a full sync and the change will be reflected.
Remove Legacy JS & CSS
If you previously used a legacy version of this add-on (when they were part of the defunct MIA brand), then your cards may have some stray CSS and JS on them which may cause performance and display issues.
In order to fix any potential issues:
- Check off the "Remove Legacy JS & CSS" checkbox.
- Click the "Apply" button.
- Perform a full sync.
Historical Conversion
Historical Conversion is a sort of special "Easter Egg" feature provided by the Migaku Japanese Add-on. It has no practical implementation unless the user is interested in learning the Traditional Kanji Characters and the Historical Kana Usage, used in Japanese literature before the language reforms carried out after the end of World War 2.
One of our co-founders, Lucas was always very interested in Meiji Era literature, and included this feature to help other history or classical literature enthusiasts learn to read historical Japanese. We truly hope that it is helpful!
You can separately enable Historical Conversion for Kanji and Kana.
This feature works across all platforms including AnkiWeb, Anki Mobile, and AnkiDroid. If you find that a change to this setting is not reflected on AnkiWeb, Anki Mobile, or AnkiDroid then perform a full sync and the change will be reflected.
Active Fields Tab
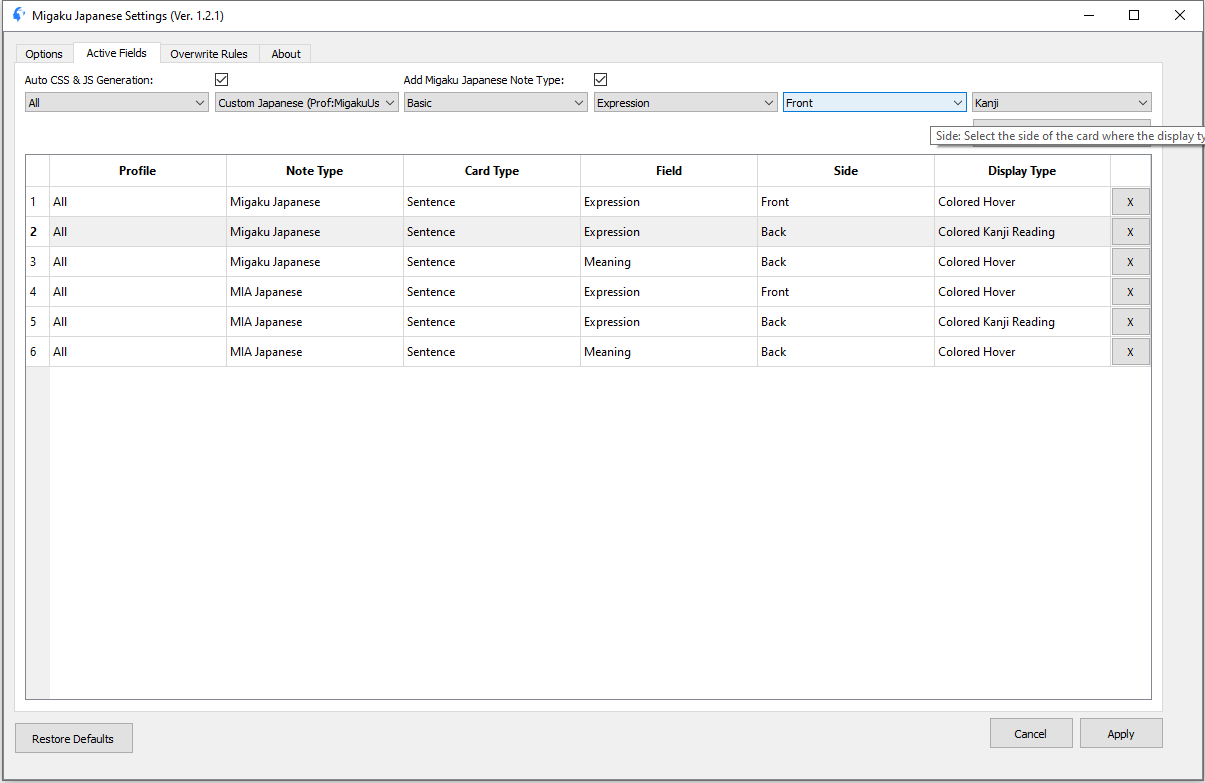
The Active Fields Tab is a sort of control center for the Migaku Japanese Add-on. This is where you decide on which of your cards the Migaku Syntax will be interpreted and displayed using the different Display Types available in the add-on.
If after making adjustments to your Active Fields you find that these changes are not reflected on AnkiWeb, Anki Mobile, or AnkiDroid then perform a full sync and those changes will be reflected.
Auto CSS & JS Generation
The Auto CCS & JS Generation option, enables and disables the add-on from automatically adjusting your Card Types, and adding the ability to interpret the Migaku Syntax into the selected Display Type.
The add-on will not function normally with this option disabled, and it should only be disabled by developers who wish to adjust the JS and CSS themselves and don't want the add-on to interfere with any changes they make.
Add Migaku Japanese Note Type
When enabled Migaku Japanese will attempt to add the Migaku Japanese Note Type to your Anki Collection if it does not already exist. If you wish to use different Note Types with the Add-on and don't want the add-on to add the Migaku Japanese Note Type after you've deleted it then disable this option.
How to Use Active Fields
Your "Active Fields" are the fields on your Cards on which Migaku Japanese will interpret the Migaku Syntax into a selected Display Type.
If you find that the Migaku Syntax is being shown as is and is not being interpreted on the computer version Anki then that means you have incorrectly configured your Active Field row for that Card Type. You will need to edit that Active Field row to resolve the issue.
If the Migaku Syntax is being correctly interpreted on the Computer version of Anki but not on AnkiWeb, Anki Mobile, or AnkiDroid then perform a full sync to resolve this issue.
Ensuring Your Card Types are Compatible
There are a few things to keep in mind when using your own Card Types with Migaku Japanese.
There are a few template syntax issues that you may run across:
- You cannot use
{{FrontSide}}on the Back Template of Card Types you will be using with Migaku Japanese. Instead you should copy the contents of the Front Template into the Back Template itself in place of using{{FrontSide}}. This should be done before adding that Card Type to your Active Fields list. - Cloze cards are not currently compatible with Migaku Japanese.
- You must remove any leading Filters from your templates' fields.
- For example, a common filter used in some Japanese decks is
furigana:and is used in this way:{{furigana:[Field Name]}}. (cloze:is a another common Field filter) - If you find that in your template there are Filters before your field names (
{{[Filter Name]:[Field Name]}}) then you must remove them and their trailing colons (:). Once you do this the syntax will be simply:{{[Field Name]}}.
- For example, a common filter used in some Japanese decks is
Adding a New Active Field
Once you have ensured that you will be adding a compatible Card Type to your Active Fields list then you are ready to add a new Active Field.
You can do this by selecting an option for each of the drop-down menus that appear on top of the Active Field List and pressing the "Add" button.
The drop-down menu options are as follows:
- Profile
- The Profile(s) where the Migaku Syntax for this Active Field will be active, and the necessary CSS and JS will be added to your Card Type.
- "All" is the default, meaning that a Card Type by that name will be affected across all of your Anki Profiles.
- Note Type
- The Note Type where the field you want to be affected is found.
- If "All" is selected as the Profile you will also see the Profile where that Note Type is found in parentheses after the name of the Note Type itself (
[Note Type Name] (Prof: [Profile Name])).- This allows you to make sure you are selecting the correct Note Type in the case you have note types by the same name that have different associated Card Types and Field Names across different Anki Profiles.
- Card Type
- The Card Type that you want to be affected.
- Field
- The Field that you want to be affected.
- Side
- Whether you want the Migaku Syntax for this field to be interpreted according to your selected Display Type on the Front Side, the Back Side, or both sides of your cards.
- Display Type
- How you want the add-on to interpret and display the the Migaku Syntax.
- You can find an explanation of the different types in the Display Types section.
After you have added a new Active Field you should perform a full sync so that the changes will be correctly reflected on AnkiWeb, Anki Mobile and AnkiDroid.
Editing an Existing Active Field
To edit an existing Active Field:
- Click the Active Field row you would like to edit.
- This will load the select Active Field row into the drop-down menus.
- The "Add" button will also change to a "Cancel" button.
- Adjust the drop-down menu options as you wish.
- Once a change is made the "Cancel" button will be changed into a "Save" button.
- Click the "Save" button.
You can cancel editing an Actice Field by clicking the "Cancel" button before making any changes to its drop-down menu options or by clicking another Active Field row.
After you have edited an Active Field you should perform a full sync so that the changes will be correctly reflected on AnkiWeb, Anki Mobile and AnkiDroid.
Deleting an Existing Active Field
To delete an existing Active Field.
- Click the "X" button on the right side of the Active Field row you would like to delete.
- Confirm the deletion in the prompt.
After you have deleted an Active Field you should perform a full sync so that the changes will be correctly reflected on AnkiWeb, Anki Mobile and AnkiDroid.
Display Types
Display Types are the different ways you can display the Migaku Syntax when it is interpreted.
There are 8 different types:
1. Kanji
- No furigana or Pitch Accent Coloring is displayed. The text is displayed as it would be if the Migaku Syntax was removed from it.

2. Colored Kanji
- No furigana is displayed, but Pitch Accent Coloring is.
3. Hover
- Furigana is displayed when a word is hovered.

4. Colored Hover
- Furigana and Pitch Accent Coloring is displayed when a word is hovered.
5. Kanji Reading
- Furigana is displayed over words.
6. Colored Kanji Reading
- Furigana is displayed over words, and words are colored according to their pitch accent.
7. Reading
- All words are converted to kana.
8. Colored Reading
- All words are converted to kana and colored according to their pitch accent.

Overwrite Rules Tab
In the Overwrite Rules Tab you can browse all your current Overwrite Rules, add new rules, and edit or delete existing ones. You can also save a backup of your overwrite rules list or import a list that someone's shared with you.
**All Overwrite Rules you have added are automatically applied whenever you generate the Migaku Syntax, whether you do through the Sentence Button, the Word Button, or Mass Generation..
Adding a New Rule
To add a new rule:
- Type the text that you would like to replace in the "Original" field.
- Type the text you would like the original text to be replaced with in the "Overwrite" field.
- If you would like to apply the rule you are adding when it is added then check off "New Cards" and/or "Learned Cards":
- "New Cards" will replace the original text with the text from the "Overwrite" in all new cards across your Anki Collection.
- "Learned Cards" will replace the original text with the text from the "Overwrite" in all cards you are studying (cards that have a due date) across your Anki Collection.
- Click the "Add" button.
Editing an Existing Rule
To edit an existing rule:
- Double click a row's "Original" or "Overwrite" field to begin editing it.
- Make any changes.
- Press "Enter" or click outside of that field.
- Decide whether or not to immediately apply the rules to your collection in the prompt.
Deleting an Existing Rule
To delete an existing rule.
- Select one or more rules.
- (Select one rule by clicking it, select more than one rule by shift clicking)
- Right click to open the deletion menu.
- Click the "Delete Selected Roles" option.
- Confirm the deletion in the prompt.
Applying Rules to Your Collection
At any time you can apply you entire Overwrite Rules List to your Anki collection by checking off "New Cards" and/or "Learned Cards" and clicking the "Run" button.
- "New Cards" will apply the Overwrite Rules List to all new cards in your Anki Collection.
- "Learned Cards" apply the Overwrite Rules List to all cards you are studying (cards that have a due date) in your Anki Collection.
* This is particularly useful if you have just imported a new rules list and would like to apply it to your collection.
Importing and Exporting Rule Lists
To Export your Overwrite Rules List:
- Click the Export button.
- Choose where you would like to save the list.
- Click the "Save" button.
To Import an Overwrite Rules List:
- Click the Import button.
- Navigate to the Overwrite Rules List you would like to import and select it.
- Click the "Open" button.
Reference
Adding an Image Field to the Migaku Japanese Note Type
To add an Image field to the Migaku Japanese Note Type:
- Navigate to
Tools->Manage Note Typesin Anki's top menu. - Select "Migaku Japanese" in the list on the left side of the window.
- Click the "Fields..." button on the right side of the window.
- Click the "Add" button.
- Name the field
"Image", and click "OK". - Click the "Save" button.
- Click the "Cards..." button.
- Select the "Back Template" at the top of the screen.
- Above the line that says
<!--###MIGAKU JAPANESE SUPPORT JS START###paste this text:<br>{{Image}}- The result will be:
...
{{^Audio on Front}}{{Audio}}{{/Audio on Front}}
<br>{{Image}}
<!--###MIGAKU JAPANESE SUPPORT JS START###
...
- Click the "Save" button and close the "Note Types" Window.
You will now have an image that will appear on the back of your cards that use the Migaku Japanese Note Type.
Pitch Accent Patterns
There are 5 Pitch Accent Patterns used in the Migaku Japanese Add-on.
First, Migaku Japanese uses the 4 standard patterns of Pitch Accent:
1. 平板(へいばん)/Heiban
- If the word doesn't have an accent, the pitch rises from a low starting point on the first mora or two, and then levels out in the middle of the speaker's range, without ever reaching the high tone of an accented mora. In Japanese this accent is named 平板(へいばん)/Heiban ("flat-board").
Heiban words are colored blue by default.
* Heiban is by far the most common pattern.
2. 頭高(あたまだか)/Atamadaka
- If the accent is on the first mora, then the pitch starts high, drops suddenly on the second mora, then levels out. The pitch may fall across both morae, or mostly on one or the other (depending on the sequence of sounds)—that is, the first mora may end with a high falling pitch, or the second may begin with a (low) falling pitch, but the first mora will be considered accented regardless. The Japanese describe this as 頭高(あたまだか)/Atamadaka (literally, "head-high").
Atamadaka words are colored red by default.
3. 中高(なかだか)/Nakadaka
- If the accent is on a mora other than the first or the last, then the pitch has an initial rise from a low starting point, reaches a near-maximum at the accented mora, then drops suddenly on any following morae. This accent is referred to as 中高(なかだか)/Nakadaka ("middle-high").
Nakadaka words are colored light orange by default.
4. 尾高(おだか)/Odaka
- If the word has an accent on the last mora, the pitch rises from a low start up to a high pitch on the last mora. Words with this accent are especially distinguishable from accent-less words because the pitch immediately drops on a following particle such as が ga or に ni. In Japanese this accent is called 尾高(おだか)/Odaka ("tail-high").
Odaka words are colored green by default.
You can find out more about these patterns from this article, if you'd like.
The Migaku Japanese Add-on adds one more pattern to these 4 that applies only to verbs and adjectives:
5. 起伏(きふく)/Kifuku
Verbs and Adjectives in Japanese are either Heiban or have a drop 2 moras from their final mora.
Since this rule applies to all verbs and adjectives in Japanese we can make a more simple distinction in pitch for verbs and adjectives. We can think of them as either being Heiban or Kifuku. This is makes memorizing the pitch accents much easier since it simplifies all verbs and adjectives to one of two patterns.
- Means literally: "rise-fall"
- When used, signifies that the unconjugated Dictionary Form of a verb or adjective has a drop. (You can hover a word to see where the drop occurs.)
Kifuku verbs and adjectives are colored purple by default.
Compound Words with 2 Patterns
There are some words that have more than one pitch accent within the same word itself. This happens when the word in question is actually a compound word made up of 2 words that each have a different pitch accent. This most often happens with four character compounds.
When the add-on runs across such a word it is incapable of breaking the larger compound word down into its 2 base words and applying a pitch accent to each of them. (The required information to split the base words at their boundaries accurately does not exist within the add-on's dataset and therefore it is not possible.)
Instead the add-on will make it known to the user that this word is a compound word and that each of its base words has a different accent.
Let's take a look at how it does this:
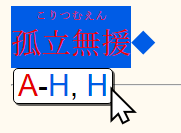
The above word "孤立無援" is made up of 2 different words "孤立" and "無援". In the compound word "孤立無援", there are 2 accents that are pronounced (just as if you were saying the 2 base words independently). "孤孤" is Atamada, while "無援" is Heiban. Since the add-on cannot accurately split words at their boundaries it will instead:
- Color the text of the compound word, the color of the pitch accent of the first word.
- Give the compound word a background, that is the color of the pitch accent of the second word.
- Notice that when hovered, no pitch accent graph is shown for word in the Pitch Accent Popup.
- This is because the add-on doesn't have information about how to split the word and apply the pitch accent patterns to the base words.
This can very rarely lead to a word becoming unreadable unless, on the occassion that both base words have the same pitch accent:
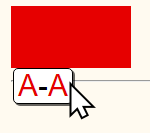 We can see that the word "唇歯輔車" becomes obscured because both of its base words have the 頭高(あたまだか)/Atamadaka pattern, making both the text and the background red. This will be fixed in a future update.
We recommend Adding an Overwrite Rule when you run across such words that splits these words into their base forms. For example the syntax for "唇歯輔車" would change:
- From:
唇歯輔車[しんしほしゃ;aa]- To:唇歯[しんし;a] 輔車[ほしゃ;a] - Please reference this section of the guide to find out more.
How to Perform a Full Sync
To perform a full sync:
- Navigate to
Tools->Preferences...from Anki's top menu bar. - Click the "Network" tab.
- Check off the "On next sync, force changes in one direction" checkbox.
- Click "Close".
- Click the "Sync" button on Anki's Main Screen.
- Click "Upload to AnkiWeb" in the prompt.